> ## Documentation Index
> Fetch the complete documentation index at: https://docs.nikaplanet.com/llms.txt
> Use this file to discover all available pages before exploring further.
# Publish a Map (with Access Control)
> Learn how to publish your map with team-only, public or password-protected access, including thumbnail generation and collaboration features
Learn how to publish your NikaMap for team-only, public, or password-protected sharing. You can publish maps with different names, generate thumbnails using AI, and control access settings.
## Step 1: Access Publish Options
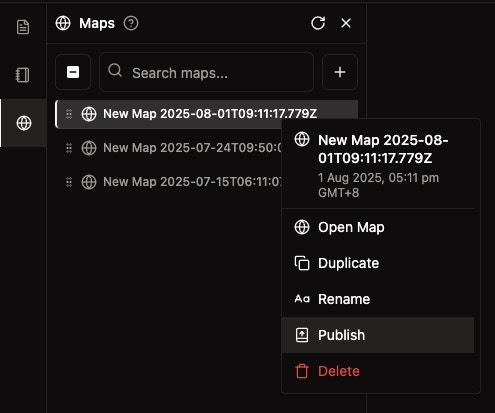
### Method 1: Right-Click on Map List
1. **Open Map List**: Navigate to your maps in the left panel
2. **Right-click Map**: Right-click on the map you want to publish
3. **Select "Publish"**: Choose the publish option from the context menu
 ### Method 2: Publish Button in Map
1. **Open Your Map**: Open the map you want to publish
2. **Find Publish Button**: Look for the publish button in the top-right toolbar
3. **Click Publish**: Click the publish button to open the publish dialog
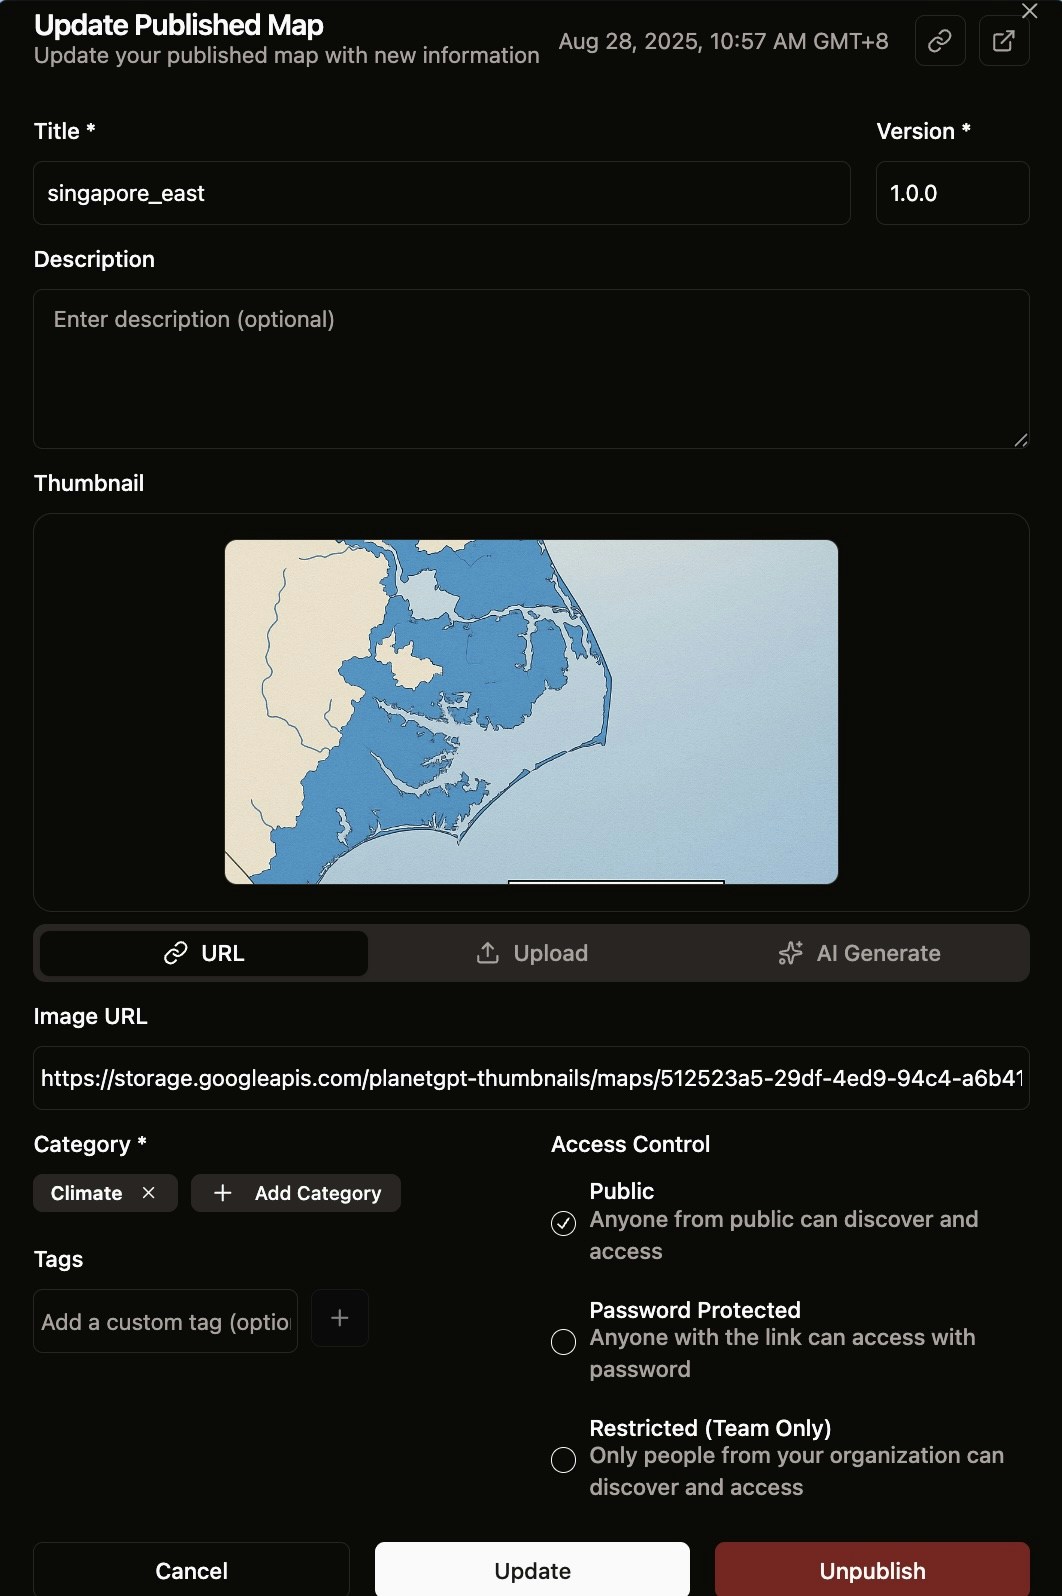
## Step 2: Fill in Compulsory Fields
### Required Information (marked with asterisk \*)
1. **Title**\*: Enter a descriptive name for your published map
2. **Version**\*: Specify the version number (e.g., "1.0.0")
3. **Category**\*: Add at least one category by clicking "+ Add Category"
### Optional Information
* **Description**: Add a detailed description of the map content (optional)
* **Tags**: Add relevant tags for categorization (optional)
### Thumbnail Options
You have three options for creating a thumbnail:
#### Option 1: URL
* Enter an image URL in the "Image URL" field
#### Option 2: Upload
* Click "Upload" and select an image file from your computer
#### Option 3: AI Generate (Recommended if no thumbnail)
* Click "AI Generate" with the sparkle icon
* AI will automatically create a relevant thumbnail based on your map content
### Access Control Settings
* **Public**: Anyone from public can discover and access the map. All public content can be found at [Nika Hub](https://planet.nika.eco/en/hub)
* **Password Protected**: Anyone with the link can access with password. Share the link and password with specific users
* **Restricted (Team Only)**: Only people from your organization can discover and access. All team published content can be found at [Team Hub](https://planet.nika.eco/en/dashboard/team-hub) if you are already signed in
### Method 2: Publish Button in Map
1. **Open Your Map**: Open the map you want to publish
2. **Find Publish Button**: Look for the publish button in the top-right toolbar
3. **Click Publish**: Click the publish button to open the publish dialog
## Step 2: Fill in Compulsory Fields
### Required Information (marked with asterisk \*)
1. **Title**\*: Enter a descriptive name for your published map
2. **Version**\*: Specify the version number (e.g., "1.0.0")
3. **Category**\*: Add at least one category by clicking "+ Add Category"
### Optional Information
* **Description**: Add a detailed description of the map content (optional)
* **Tags**: Add relevant tags for categorization (optional)
### Thumbnail Options
You have three options for creating a thumbnail:
#### Option 1: URL
* Enter an image URL in the "Image URL" field
#### Option 2: Upload
* Click "Upload" and select an image file from your computer
#### Option 3: AI Generate (Recommended if no thumbnail)
* Click "AI Generate" with the sparkle icon
* AI will automatically create a relevant thumbnail based on your map content
### Access Control Settings
* **Public**: Anyone from public can discover and access the map. All public content can be found at [Nika Hub](https://planet.nika.eco/en/hub)
* **Password Protected**: Anyone with the link can access with password. Share the link and password with specific users
* **Restricted (Team Only)**: Only people from your organization can discover and access. All team published content can be found at [Team Hub](https://planet.nika.eco/en/dashboard/team-hub) if you are already signed in
 ## Step 3: Update Published Map
### Access Update Options
1. **Open Published Map**: Open your published map
2. **Find Update Button**: Look for the update option in the publish dialog
3. **Modify Information**: Change any of the following:
* Title and version
* Description
* Categories
* Thumbnail (URL, upload, or AI generate)
* Tags
* Access Control (Public, Password Protected, or Team Only)
### Update Process
1. **Make Changes**: Modify the desired information
2. **Review Settings**: Double-check all settings
3. **Click "Update"**: Click the update button to republish changes
4. **Alternative: Unpublish**: Use "Unpublish" button to remove from public/team access
## Step 3: Update Published Map
### Access Update Options
1. **Open Published Map**: Open your published map
2. **Find Update Button**: Look for the update option in the publish dialog
3. **Modify Information**: Change any of the following:
* Title and version
* Description
* Categories
* Thumbnail (URL, upload, or AI generate)
* Tags
* Access Control (Public, Password Protected, or Team Only)
### Update Process
1. **Make Changes**: Modify the desired information
2. **Review Settings**: Double-check all settings
3. **Click "Update"**: Click the update button to republish changes
4. **Alternative: Unpublish**: Use "Unpublish" button to remove from public/team access
 ## Step 4: View Published Map
### Access Published Map
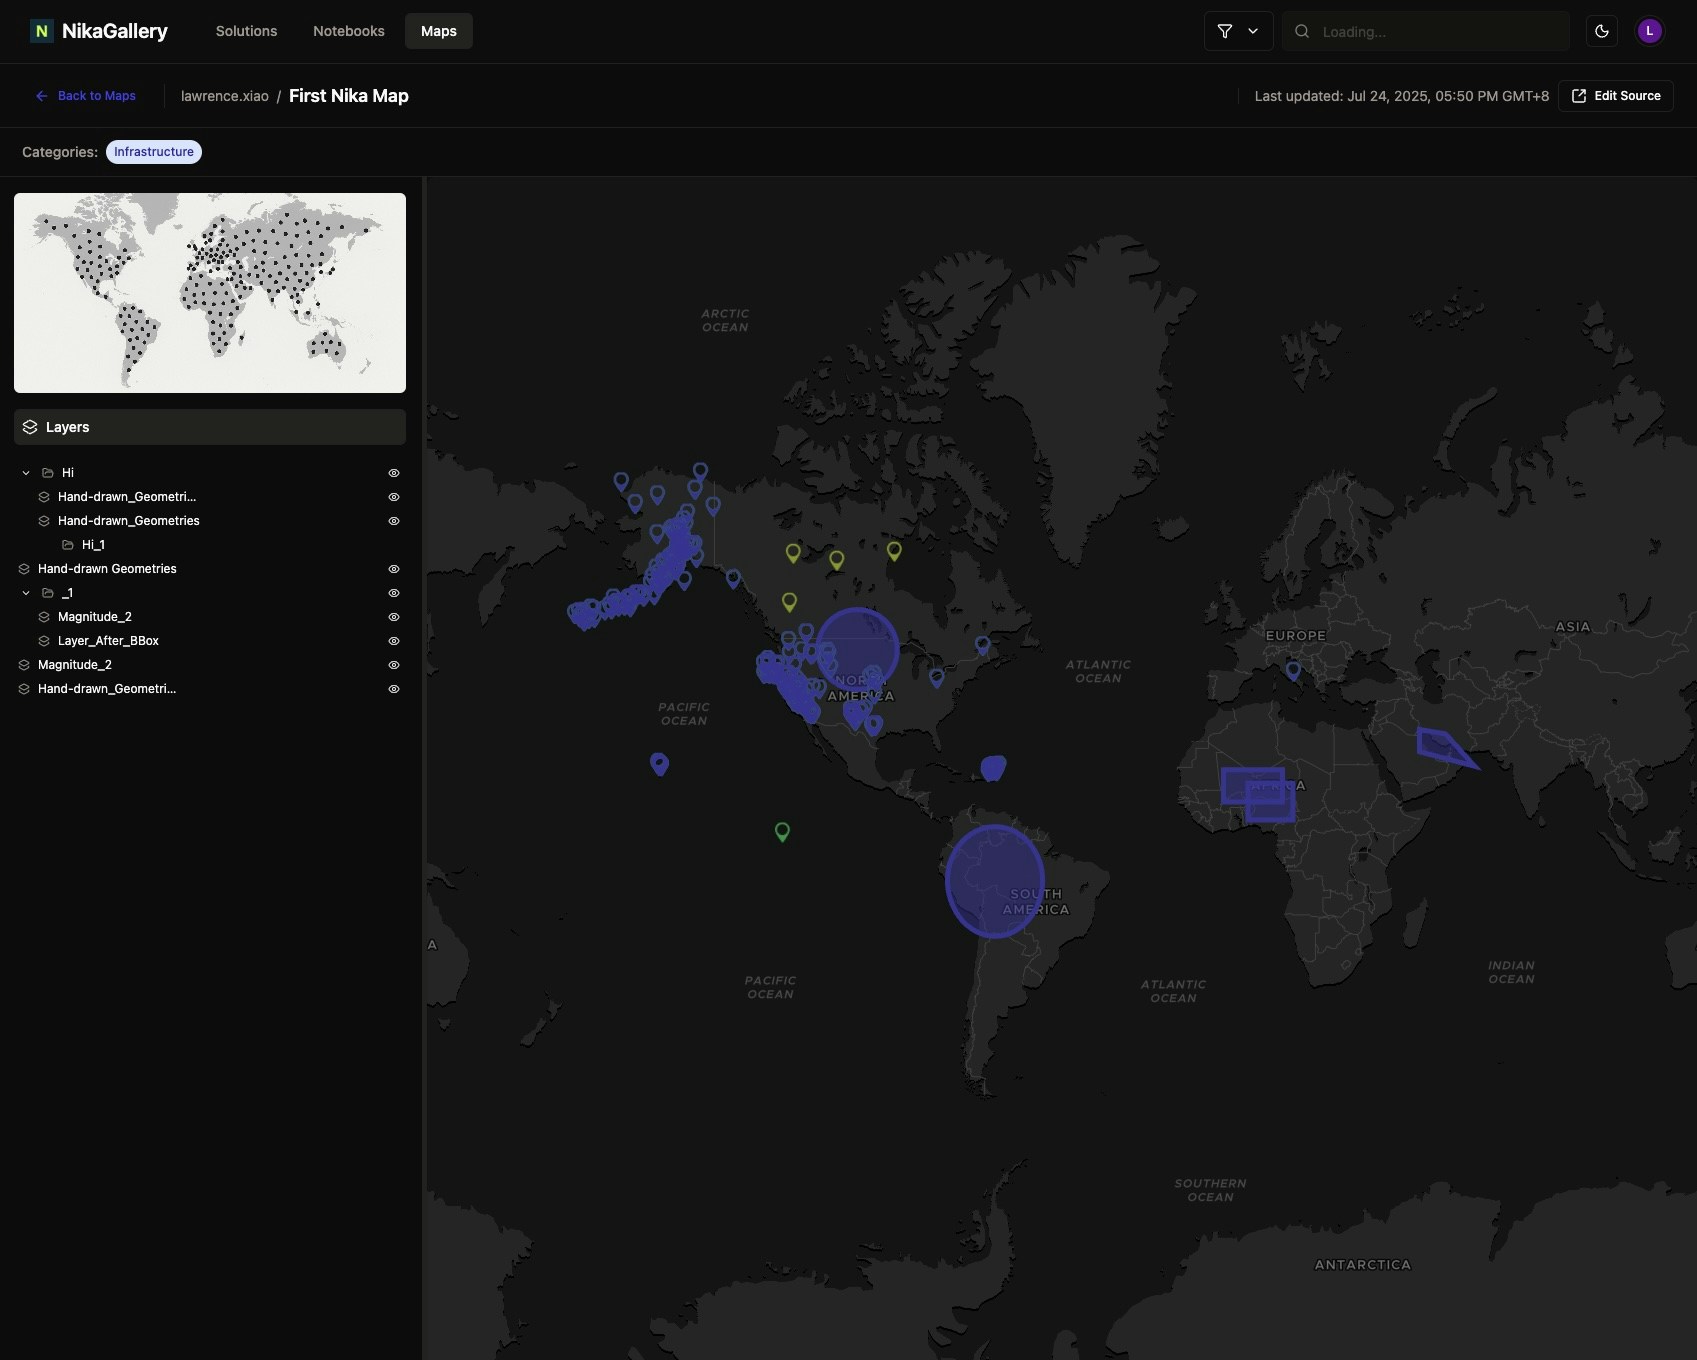
1. **Click Arrow Icon**: Click the arrow icon at the top right of the publish dialog
2. **New Tab Opens**: A new browser tab will open with your published map
3. **Static View**: The map opens in a static, view-only format
### Published Map Features
* **View-Only Access**: Users can view but not edit the map
* **Layer Visibility**: All layers are visible as configured
* **Interactive Elements**: Map maintains interactive features like zoom and pan
* **Public Hub**: If published publicly, the map appears in the NikaHub
## Step 4: View Published Map
### Access Published Map
1. **Click Arrow Icon**: Click the arrow icon at the top right of the publish dialog
2. **New Tab Opens**: A new browser tab will open with your published map
3. **Static View**: The map opens in a static, view-only format
### Published Map Features
* **View-Only Access**: Users can view but not edit the map
* **Layer Visibility**: All layers are visible as configured
* **Interactive Elements**: Map maintains interactive features like zoom and pan
* **Public Hub**: If published publicly, the map appears in the NikaHub
 ## Best Practices
### Before Publishing
* **Finalize Your Map**: Ensure all layers and styling are complete
* **Set Initial View**: Position the map at the desired initial view
* **Test Functionality**: Test all interactive features
* **Optimize Performance**: Ensure good loading performance
### Content Quality
* **Accurate Data**: Ensure data accuracy and currency
* **Clear Visualization**: Create clear and informative visualizations
* **Proper Styling**: Use appropriate styling and colors
* **Clear Documentation**: Provide clear descriptions and documentation
### Publishing Strategy
* **Consistent Naming**: Use consistent naming conventions
* **Regular Updates**: Keep published maps current and updated
* **Quality Assurance**: Implement quality assurance processes
* **Community Engagement**: Engage with community feedback
## Troubleshooting
### Common Issues
* **Publishing Fails**: Check that all required fields (marked with \*) are filled
* **Thumbnail Issues**: Use AI generation if you don't have a thumbnail
* **Permission Problems**: Verify access control settings (Public, Password Protected, or Team Only)
* **Update Issues**: Ensure you click "Update" after making changes
### Solutions
* **Validate Data**: Ensure all data is valid and properly formatted
* **Check Required Fields**: Review all fields marked with asterisks
* **Test Locally**: Test map functionality before publishing
* **Contact Support**: Contact support for persistent issues
## Next Steps
Now that you've published your map:
1. **Share**: Share your published map with your team or community
2. **Monitor**: Monitor engagement and feedback
3. **Update**: Keep your map current and updated
4. **Engage**: Engage with the community and respond to feedback
Happy publishing!
## Best Practices
### Before Publishing
* **Finalize Your Map**: Ensure all layers and styling are complete
* **Set Initial View**: Position the map at the desired initial view
* **Test Functionality**: Test all interactive features
* **Optimize Performance**: Ensure good loading performance
### Content Quality
* **Accurate Data**: Ensure data accuracy and currency
* **Clear Visualization**: Create clear and informative visualizations
* **Proper Styling**: Use appropriate styling and colors
* **Clear Documentation**: Provide clear descriptions and documentation
### Publishing Strategy
* **Consistent Naming**: Use consistent naming conventions
* **Regular Updates**: Keep published maps current and updated
* **Quality Assurance**: Implement quality assurance processes
* **Community Engagement**: Engage with community feedback
## Troubleshooting
### Common Issues
* **Publishing Fails**: Check that all required fields (marked with \*) are filled
* **Thumbnail Issues**: Use AI generation if you don't have a thumbnail
* **Permission Problems**: Verify access control settings (Public, Password Protected, or Team Only)
* **Update Issues**: Ensure you click "Update" after making changes
### Solutions
* **Validate Data**: Ensure all data is valid and properly formatted
* **Check Required Fields**: Review all fields marked with asterisks
* **Test Locally**: Test map functionality before publishing
* **Contact Support**: Contact support for persistent issues
## Next Steps
Now that you've published your map:
1. **Share**: Share your published map with your team or community
2. **Monitor**: Monitor engagement and feedback
3. **Update**: Keep your map current and updated
4. **Engage**: Engage with the community and respond to feedback
Happy publishing!