> ## Documentation Index
> Fetch the complete documentation index at: https://docs.nikaplanet.com/llms.txt
> Use this file to discover all available pages before exploring further.
# Installation & Setup
> Install GeoEngine, set up prerequisites, initialise AI agent skills, and configure GIS plugins
export const platform_1 = "Linux"
export const platform_0 = "macOS"
Get GeoEngine installed and ready to use on your machine. This guide walks you through installing Docker, the GeoEngine CLI, logging in, and optionally setting up AI agent skills and GIS plugin support.
## Prerequisites
Before installing GeoEngine, make sure you have the following:
### Required
* **[Docker](https://docs.docker.com/get-docker/)** — GeoEngine runs all workers in Docker containers. Install Docker Desktop (macOS/Windows) or Docker Engine (Linux) and ensure it is running before using any GeoEngine commands.
### Optional
* **GIS Platform(s)** — Install one or both if you want to run workers directly from your GIS software:
* [QGIS](https://qgis.org) (open source)
* [ArcGIS Pro](https://pro.arcgis.com/en/pro-app/latest/get-started/download-arcgis-pro.htm)
* **AI Agent(s)** — Install one or more if you want to use AI to create and manage workers automatically:
* [Claude Code](https://claude.ai/code) by Anthropic (recommended)
* [Cursor](https://cursor.com) by Cursor AI
* [GitHub Copilot](https://github.com/features/copilot) by VS Code / Microsoft
* [Codex](https://openai.com/codex/) by OpenAI
* [Antigravity](https://antigravity.google) by Google
* NIKA local agent tooling, if your organisation uses it
***
## Step 1: Install GeoEngine
Choose the installation method that matches your platform:
**Homebrew (recommended)**
```bash theme={null}
brew tap NikaGeospatial/geoengine
brew install geoengine
```
**Shell script (alternative)**
```bash theme={null}
curl -fsSL https://raw.githubusercontent.com/NikaGeospatial/geoengine/main/install/install.sh | bash
```
Open **PowerShell as Administrator** and run:
```powershell theme={null}
irm https://raw.githubusercontent.com/NikaGeospatial/geoengine/main/install/install.ps1 | iex
```
```bash theme={null}
curl -fsSL https://raw.githubusercontent.com/NikaGeospatial/geoengine/main/install/install.sh | bash
```
This also works in WSL2 on Windows.
### Offline / Air-Gapped Installation
If your machine has no internet access, copy the `geoengine` binary to the target machine first, then run:
```bash theme={null}
./install.sh --local ./geoengine
```
***
## Setup Troubleshooting
**Xcode Command Line Tools Error**
GeoEngine itself does not depend on Xcode — it runs workers inside Docker containers. However, **Homebrew** (the macOS package manager used to install the GeoEngine CLI) requires the Xcode Command Line Tools to compile and link packages during installation. Without a compatible version of Xcode or its Command Line Tools, Homebrew cannot build the dependencies it needs, and the `brew install geoengine` step will fail.
If you see errors related to **Xcode** or **Xcode Command Line Tools** when using Homebrew — such as:
```
Error: Your Xcode (14.0) is too outdated.
```
```
Error: Xcode alone is not sufficient on Catalina/Big Sur/Monterey/Ventura/Sonoma/Sequoia.
```
```
xcode-select: error: command line tools are already installed, use "Software Update" to install updates
```
You need to install or update Xcode before proceeding:
1. Visit the [Apple Developer Downloads](https://developer.apple.com/download/all/) page
2. Sign in with your Apple ID
3. Search for the latest version of **Xcode** compatible with your macOS version
4. Download and install it
5. After installation, open a terminal and run:
```bash theme={null}
sudo xcode-select --switch /Applications/Xcode.app/Contents/Developer
sudo xcodebuild -runFirstLaunch
```
6. Then retry the Homebrew installation:
```bash theme={null}
brew tap NikaGeospatial/geoengine
brew install geoengine
```
If you only need the **Command Line Tools** (without the full Xcode IDE), you can install them with `xcode-select --install`. However, some Homebrew formulae require the full Xcode application.
No platform-specific issues are common at this stage. If you encounter problems, check that:
* PowerShell was run **as Administrator**
* **Docker Desktop** is installed and running
* Your Windows version supports WSL2 (Windows 10 version 2004+ or Windows 11)
No platform-specific issues are common at this stage. If you encounter problems, check that:
* **Docker Engine** is installed and the `docker` command is available
* Your user is in the `docker` group (so you can run `docker` without `sudo`):
```bash theme={null}
sudo usermod -aG docker $USER
```
Log out and back in after running this command.
***
## Step 2: Log In
GeoEngine requires a free Nika account. Run the login command before using worker build, run, registry, and cloud commands:
```bash theme={null}
geoengine auth login
```
This will open a browser window where you can authorise GeoEngine with your Nika account. If the browser does not open automatically, the terminal will display a URL — hold **Cmd** (macOS) or **Ctrl** (Windows/Linux) and click the URL to open it manually.
 Click **Authorize** to complete the login. Your credentials are stored securely on your machine after the first login. You only need to run `geoengine auth login` again if your credentials expire or become corrupted. Commands such as `geoengine setup`, `geoengine lint`, `geoengine patch`, `geoengine update`, and `geoengine uninstall` do not require login, but worker commands like `geoengine apply`, `geoengine run`, `geoengine workers`, and `geoengine push` will prompt you to log in if your session is missing.
***
## Step 3: Initialise AI Agent Skills (Optional)
If you have an AI agent installed, run the following to install the GeoEngine skill bundle into your agent:
```bash theme={null}
geoengine setup skills
```
You will be prompted to select which agent(s) to install skills for:
* **Claude** (Anthropic) — recommended
* **Cursor** (Cursor AI)
* **GitHub Copilot** (VS Code / Microsoft)
* **Codex** (OpenAI)
* **Antigravity** (Google)
* **NIKA** (local NIKA tooling)
GeoEngine currently installs one top-level skill, `use-geoengine`. That skill contains the internal workflow guidance, references, and templates needed for worker creation, YAML updates, dependency updates, tests, cloud push, and maintenance commands. Skills that are already up to date are skipped; changed or missing files are installed automatically.
To install skills for one agent non-interactively, pass `--agent`:
```bash theme={null}
geoengine setup skills --agent Codex
```
### Verify Skills Are Working
After installing, open your AI agent and run the following prompt:
```
What skills do you have?
```
If the agent lists the GeoEngine skill (`use-geoengine`), the installation was successful.
If the agent does not mention the GeoEngine skill in its response, try prompting more specifically:
```
Do you have any GeoEngine-related skills installed?
```
If the agent still does not recognise the skill, check that the skill files are in the correct agent folder (e.g. `~/.claude/skills` for Claude Code) and restart your agent.
See [Create & Modify a Worker Using AI Coder](/guides/custom-geoprocess-deployment/ai-coder-worker) for the full workflow.
***
## GIS Plugin Installation (If Using QGIS or ArcGIS Pro)
This step is only required if you plan to run GeoEngine workers from **QGIS** or **ArcGIS Pro**. If you only use the CLI or AI agents to run workers, you can skip this step entirely.
Install the local GIS plugin once with:
```bash theme={null}
geoengine setup plugins
```
You can also install a specific plugin non-interactively:
```bash theme={null}
geoengine setup plugins --qgis
geoengine setup plugins --arcgis # Windows only
geoengine setup plugins --all
```
After the plugin is installed, applied workers are discovered from your local GeoEngine registry. You no longer need to enable individual workers with a `plugins:` section in `geoengine.yaml`.
If you upgrade GeoEngine later, run `geoengine patch` to bring all plugins back in sync:
```bash theme={null}
geoengine patch
```
***
## Next Steps
You are now ready to start using GeoEngine! Follow the [step-by-step guide](/guides/custom-geoprocess-deployment/step-by-step) to create your first worker!
***
## Enabling GIS Plugin
This section will only apply after you have done the `geoengine setup plugins` step. It is included for your information, but not part of
GeoEngine's core installation.
You can install QGIS from the [QGIS website](https://qgis.org).
Click **Authorize** to complete the login. Your credentials are stored securely on your machine after the first login. You only need to run `geoengine auth login` again if your credentials expire or become corrupted. Commands such as `geoengine setup`, `geoengine lint`, `geoengine patch`, `geoengine update`, and `geoengine uninstall` do not require login, but worker commands like `geoengine apply`, `geoengine run`, `geoengine workers`, and `geoengine push` will prompt you to log in if your session is missing.
***
## Step 3: Initialise AI Agent Skills (Optional)
If you have an AI agent installed, run the following to install the GeoEngine skill bundle into your agent:
```bash theme={null}
geoengine setup skills
```
You will be prompted to select which agent(s) to install skills for:
* **Claude** (Anthropic) — recommended
* **Cursor** (Cursor AI)
* **GitHub Copilot** (VS Code / Microsoft)
* **Codex** (OpenAI)
* **Antigravity** (Google)
* **NIKA** (local NIKA tooling)
GeoEngine currently installs one top-level skill, `use-geoengine`. That skill contains the internal workflow guidance, references, and templates needed for worker creation, YAML updates, dependency updates, tests, cloud push, and maintenance commands. Skills that are already up to date are skipped; changed or missing files are installed automatically.
To install skills for one agent non-interactively, pass `--agent`:
```bash theme={null}
geoengine setup skills --agent Codex
```
### Verify Skills Are Working
After installing, open your AI agent and run the following prompt:
```
What skills do you have?
```
If the agent lists the GeoEngine skill (`use-geoengine`), the installation was successful.
If the agent does not mention the GeoEngine skill in its response, try prompting more specifically:
```
Do you have any GeoEngine-related skills installed?
```
If the agent still does not recognise the skill, check that the skill files are in the correct agent folder (e.g. `~/.claude/skills` for Claude Code) and restart your agent.
See [Create & Modify a Worker Using AI Coder](/guides/custom-geoprocess-deployment/ai-coder-worker) for the full workflow.
***
## GIS Plugin Installation (If Using QGIS or ArcGIS Pro)
This step is only required if you plan to run GeoEngine workers from **QGIS** or **ArcGIS Pro**. If you only use the CLI or AI agents to run workers, you can skip this step entirely.
Install the local GIS plugin once with:
```bash theme={null}
geoengine setup plugins
```
You can also install a specific plugin non-interactively:
```bash theme={null}
geoengine setup plugins --qgis
geoengine setup plugins --arcgis # Windows only
geoengine setup plugins --all
```
After the plugin is installed, applied workers are discovered from your local GeoEngine registry. You no longer need to enable individual workers with a `plugins:` section in `geoengine.yaml`.
If you upgrade GeoEngine later, run `geoengine patch` to bring all plugins back in sync:
```bash theme={null}
geoengine patch
```
***
## Next Steps
You are now ready to start using GeoEngine! Follow the [step-by-step guide](/guides/custom-geoprocess-deployment/step-by-step) to create your first worker!
***
## Enabling GIS Plugin
This section will only apply after you have done the `geoengine setup plugins` step. It is included for your information, but not part of
GeoEngine's core installation.
You can install QGIS from the [QGIS website](https://qgis.org).
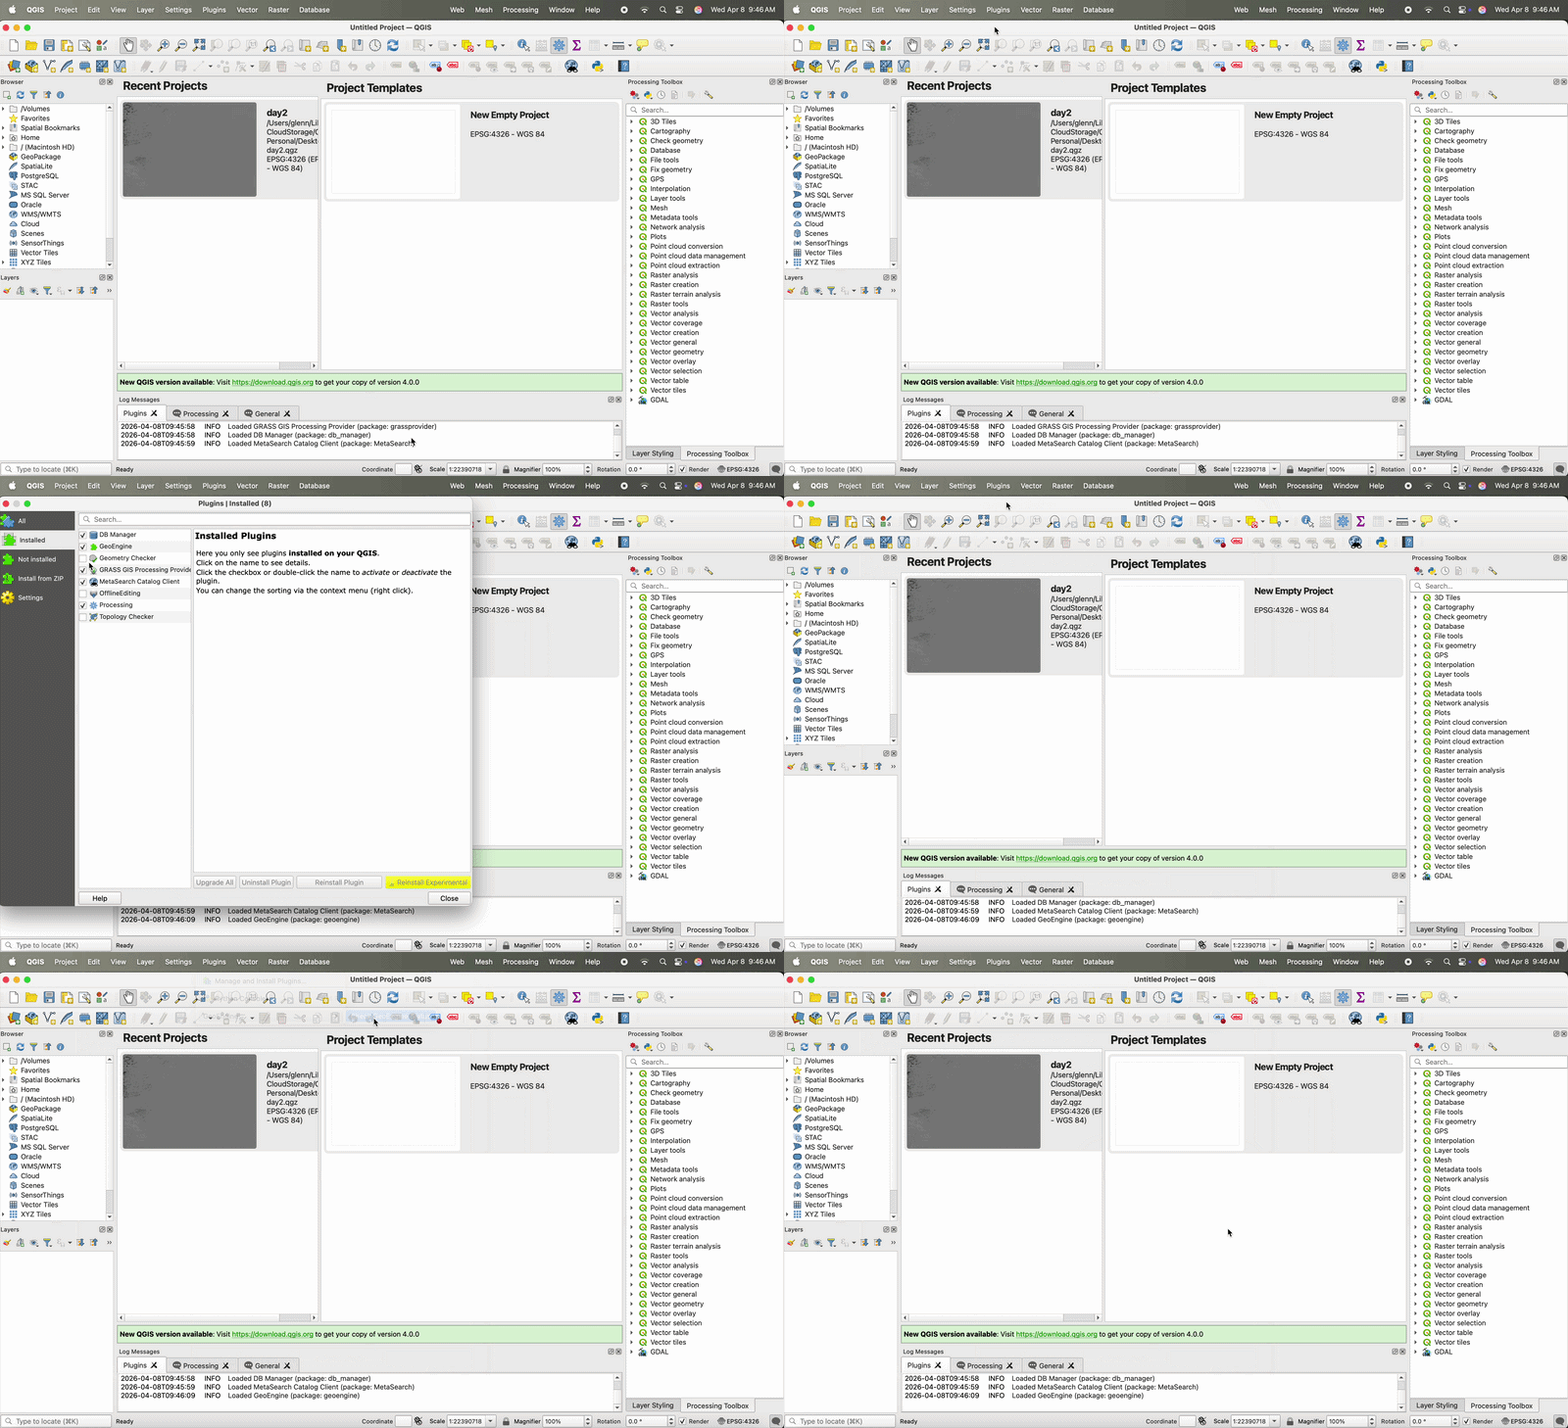 1. Run `geoengine setup plugins --qgis`, or select QGIS from the interactive plugin menu.
2. Open QGIS and in the top bar, click **Plugins** > **Manage and Install Plugins...**
3. Navigate to the **Installed** tab and enable the **GeoEngine** plugin
4. GeoEngine will now be available in the **Processing** menu
See [Running Workers in ArcGIS Pro & QGIS](/guides/custom-geoprocess-deployment/running-in-gis) for how to use the plugins once installed.
You can install ArcGIS Pro from the [ArcGIS website](https://pro.arcgis.com/en/pro-app/latest/get-started/download-arcgis-pro.htm).
1. Run `geoengine setup plugins --arcgis`, or select ArcGIS from the interactive plugin menu.
2. GeoEngine prints the path to `GeoEngineTools.pyt`.
3. In ArcGIS Pro, navigate to the **Catalog** pane and right-click **Toolboxes** > **Add Toolbox**.
4. Select the printed `GeoEngineTools.pyt` path and click **OK**.
5. **GeoEngine Tools** should now be available in your Toolboxes.
See [Running Workers in ArcGIS Pro & QGIS](/guides/custom-geoprocess-deployment/running-in-gis) for how to use the plugins once installed.
ArcGIS Pro is not supported on {platform_0}.
ArcGIS Pro is not supported on {platform_1}.
1. Run `geoengine setup plugins --qgis`, or select QGIS from the interactive plugin menu.
2. Open QGIS and in the top bar, click **Plugins** > **Manage and Install Plugins...**
3. Navigate to the **Installed** tab and enable the **GeoEngine** plugin
4. GeoEngine will now be available in the **Processing** menu
See [Running Workers in ArcGIS Pro & QGIS](/guides/custom-geoprocess-deployment/running-in-gis) for how to use the plugins once installed.
You can install ArcGIS Pro from the [ArcGIS website](https://pro.arcgis.com/en/pro-app/latest/get-started/download-arcgis-pro.htm).
1. Run `geoengine setup plugins --arcgis`, or select ArcGIS from the interactive plugin menu.
2. GeoEngine prints the path to `GeoEngineTools.pyt`.
3. In ArcGIS Pro, navigate to the **Catalog** pane and right-click **Toolboxes** > **Add Toolbox**.
4. Select the printed `GeoEngineTools.pyt` path and click **OK**.
5. **GeoEngine Tools** should now be available in your Toolboxes.
See [Running Workers in ArcGIS Pro & QGIS](/guides/custom-geoprocess-deployment/running-in-gis) for how to use the plugins once installed.
ArcGIS Pro is not supported on {platform_0}.
ArcGIS Pro is not supported on {platform_1}.