> ## Documentation Index
> Fetch the complete documentation index at: https://docs.nikaplanet.com/llms.txt
> Use this file to discover all available pages before exploring further.
# Create a Notebook to Start Analysis
> Learn how to create notebooks in NikaWorkspace for data analysis with collaborative features and auto-saving
Learn how to create notebooks in NikaWorkspace for data analysis. Notebooks are auto-saved and persisted across sessions, allowing you and your team members to collaborate on the same notebook at any time.
## Step 1: Create a Blank Notebook
### Click the "+" Icon
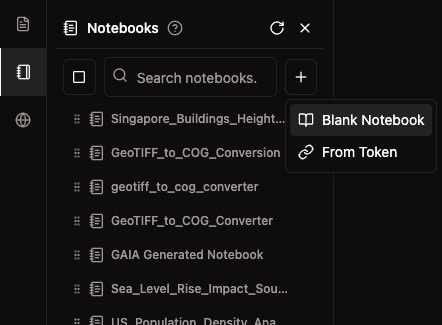
1. **Navigate to Notebooks**: Click on "Notebooks" in the left sidebar
2. **Click "+" Button**: Click the "+" button in the notebook list
3. **Select "Blank Notebook"**: Choose "Blank Notebook" from the dropdown menu
4. **Notebook Created**: A new blank notebook opens automatically
 ### Auto-Save Feature
* **Everything Auto-Saved**: All changes are automatically saved
* **No Manual Saving**: No need to click save buttons
* **Cross-Session Persistence**: Notebook persists across browser sessions
* **Team Sync**: Changes sync automatically with team members
## Step 2: Rename Your Notebook
### Edit the Title
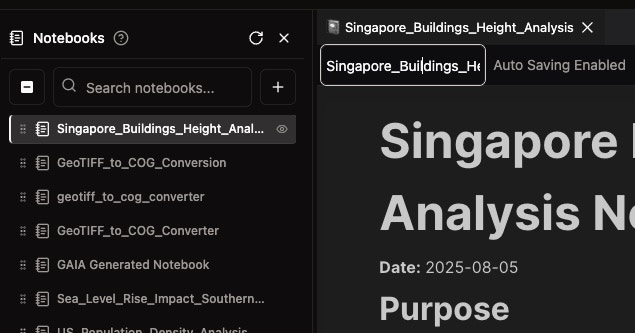
1. **Click Title Area**: Click on the notebook title at the top left
2. **Type New Name**: Enter a descriptive name for your notebook
3. **Auto-Save**: The new name is automatically saved
4. **Professional Naming**: Use clear, descriptive names like "Data Analysis Project" or "Machine Learning Model"
### Auto-Save Feature
* **Everything Auto-Saved**: All changes are automatically saved
* **No Manual Saving**: No need to click save buttons
* **Cross-Session Persistence**: Notebook persists across browser sessions
* **Team Sync**: Changes sync automatically with team members
## Step 2: Rename Your Notebook
### Edit the Title
1. **Click Title Area**: Click on the notebook title at the top left
2. **Type New Name**: Enter a descriptive name for your notebook
3. **Auto-Save**: The new name is automatically saved
4. **Professional Naming**: Use clear, descriptive names like "Data Analysis Project" or "Machine Learning Model"
 ### Naming Best Practices
* **Descriptive Names**: Use names that describe the content or purpose
* **Date Format**: Include dates if relevant (e.g., "Analysis\_2025\_08\_05")
* **Project Context**: Include project or client names if applicable
* **Version Numbers**: Add version numbers for iterative work
## Step 3: Alternative - Duplicate Existing Notebook
### Right-Click Method
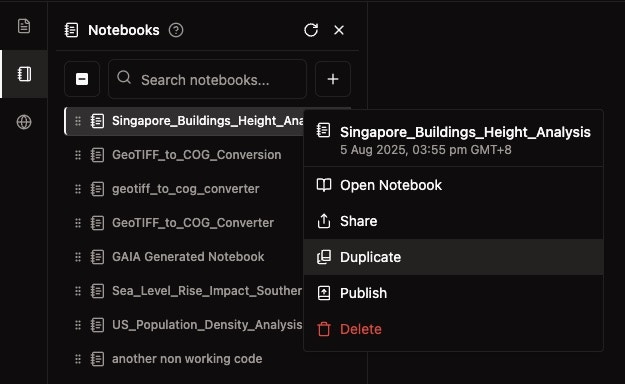
1. **Find Notebook**: Locate the notebook you want to duplicate in the list
2. **Right-Click**: Right-click on the notebook name
3. **Select "Duplicate"**: Choose "Duplicate" from the context menu
4. **New Copy Created**: A copy of the notebook is created with "(Copy)" suffix
### Naming Best Practices
* **Descriptive Names**: Use names that describe the content or purpose
* **Date Format**: Include dates if relevant (e.g., "Analysis\_2025\_08\_05")
* **Project Context**: Include project or client names if applicable
* **Version Numbers**: Add version numbers for iterative work
## Step 3: Alternative - Duplicate Existing Notebook
### Right-Click Method
1. **Find Notebook**: Locate the notebook you want to duplicate in the list
2. **Right-Click**: Right-click on the notebook name
3. **Select "Duplicate"**: Choose "Duplicate" from the context menu
4. **New Copy Created**: A copy of the notebook is created with "(Copy)" suffix
 ### When to Duplicate
* **Template Use**: Duplicate notebooks that serve as templates
* **Version Control**: Create copies before making major changes
* **Team Sharing**: Duplicate shared notebooks via link from another workspace to share notebook with others securely
* **Experiment Safely**: Test changes on a copy before modifying original
## Step 4: Add Content as Blocks
### Adding New Blocks
#### Method 1: Click "+" Icon
1. **Find "+" Button**: Look for the "+" icon on the left of any row
2. **Click "+"**: Click the "+" button to add a new block
3. **Select Block Type**: Choose from the available block types
4. **Block Added**: New block appears below the current row
#### Method 2: Keyboard Shortcut
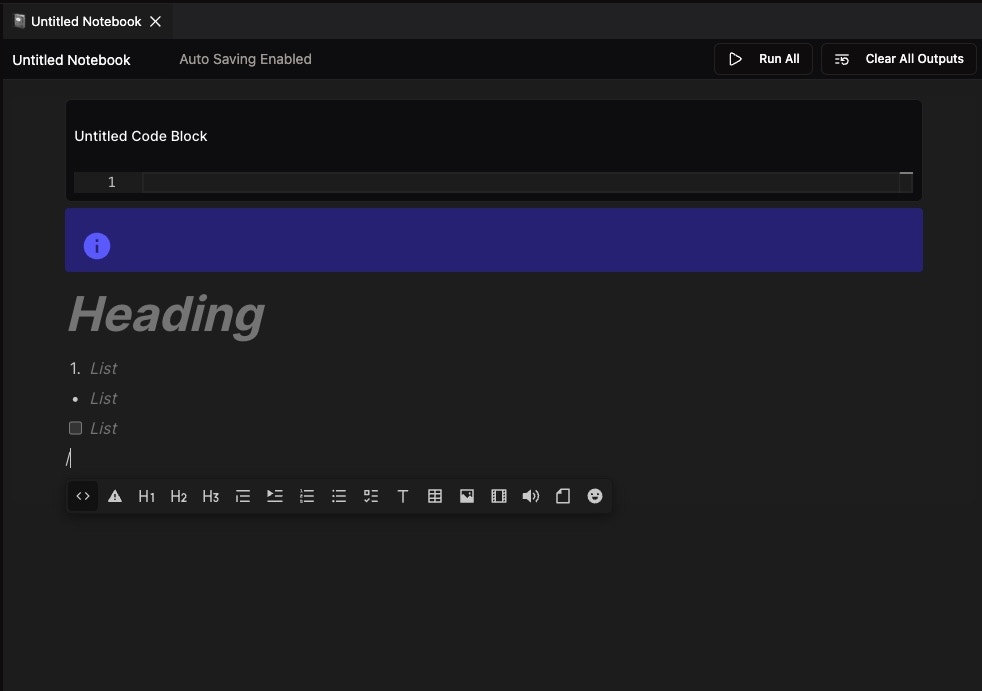
1. **Press "/"**: Type "/" in any empty row to trigger block selection
2. **Choose Block**: Select the desired block type from the menu
3. **Block Created**: New block is created with the selected type
### When to Duplicate
* **Template Use**: Duplicate notebooks that serve as templates
* **Version Control**: Create copies before making major changes
* **Team Sharing**: Duplicate shared notebooks via link from another workspace to share notebook with others securely
* **Experiment Safely**: Test changes on a copy before modifying original
## Step 4: Add Content as Blocks
### Adding New Blocks
#### Method 1: Click "+" Icon
1. **Find "+" Button**: Look for the "+" icon on the left of any row
2. **Click "+"**: Click the "+" button to add a new block
3. **Select Block Type**: Choose from the available block types
4. **Block Added**: New block appears below the current row
#### Method 2: Keyboard Shortcut
1. **Press "/"**: Type "/" in any empty row to trigger block selection
2. **Choose Block**: Select the desired block type from the menu
3. **Block Created**: New block is created with the selected type
 ### Block Toolbar
The floating toolbar provides quick access to:
* **Code Block**: `< >` icon
* **Alert Block**: `▲` icon
* **Headings**: H1, H2, H3 options
* **Lists**: Numbered, bulleted, and checkbox lists
* **Media**: Images, video, audio, and file attachments
* **Formatting**: Text blocks, tables, and emojis
### Block Types Available
#### Code Block
* **Python Code**: Write and execute Python code
* **Kernel Integration**: Runs in the selected VM kernel
* **Output Display**: Shows results, plots, and errors
* **Variable Persistence**: Variables persist across cells
#### Alert Block
* **Important Information**: Highlight important notes with blue info boxes
* **Warning Messages**: Display warnings and cautions
* **Info Boxes**: Provide additional information with white 'i' icon
* **Customizable**: Choose different alert styles
#### Content Blocks
* **Headings**: Create section headers (H1, H2, H3)
* **Paragraphs**: Add plain text paragraphs
* **Lists**: Create bulleted lists (•), numbered lists (1.), and checkboxes (☐)
* **Tables**: Create data tables with grid layout
#### Media Blocks
* **Images**: Insert images or GIFs to your notebook
* **Video Clips**: Add video content to your analysis
* **Audio**: Include audio files for multimedia notebooks
* **File Attachments**: Attach documents and other files
## Key Features
### Auto-Save and Persistence
* **Real-time Save**: Changes are saved automatically
* **No Manual Save**: No need to click save buttons
* **Cross-session**: Notebook persists across browser sessions
* **Team Sync**: Changes sync with team members
### Collaborative Features
* **Multiple Users**: Multiple team members can work simultaneously
* **Live Cursors**: See where others are working
* **Change Indicators**: Visual indicators for recent changes
* **Auto-sync**: Changes sync automatically across users
### Enhanced Over Jupyter
* **Rich Media**: Support for images, videos, and audio
* **Interactive Lists**: Checkbox lists and interactive elements
* **Alert Blocks**: Highlight important information
* **Better UI**: Modern, intuitive interface
* **Team Collaboration**: Real-time collaborative editing
## Best Practices
### Notebook Organization
* **Clear Structure**: Organize notebooks logically with headings
* **Descriptive Names**: Use clear, descriptive names
* **Documentation**: Add markdown cells for documentation
* **Modular Code**: Break code into logical sections
### Content Creation
* **Use Alerts**: Highlight important information with alert blocks
* **Rich Media**: Include images and videos to enhance analysis
* **Interactive Elements**: Use checkboxes and lists for organization
* **Clear Documentation**: Document your analysis process
### Collaboration
* **Communication**: Communicate with team members
* **Clear Comments**: Add clear comments to your code
* **Regular Updates**: Keep notebooks current and updated
* **Share Knowledge**: Use notebooks to share knowledge
## Next Steps
Now that you've created your notebook:
1. **Add Content**: Start adding code blocks and documentation
2. **Run Code**: Learn about [Running Code in Notebook](/guides/data-analysis/run-code-in-notebook)
3. **Use Libraries**: Explore [Supported Python Libraries](/guides/data-analysis/supported-python-libraries)
4. **Publish**: [Publish Your Notebook](/guides/data-analysis/publish-notebook) to share with others
Happy analyzing!
### Block Toolbar
The floating toolbar provides quick access to:
* **Code Block**: `< >` icon
* **Alert Block**: `▲` icon
* **Headings**: H1, H2, H3 options
* **Lists**: Numbered, bulleted, and checkbox lists
* **Media**: Images, video, audio, and file attachments
* **Formatting**: Text blocks, tables, and emojis
### Block Types Available
#### Code Block
* **Python Code**: Write and execute Python code
* **Kernel Integration**: Runs in the selected VM kernel
* **Output Display**: Shows results, plots, and errors
* **Variable Persistence**: Variables persist across cells
#### Alert Block
* **Important Information**: Highlight important notes with blue info boxes
* **Warning Messages**: Display warnings and cautions
* **Info Boxes**: Provide additional information with white 'i' icon
* **Customizable**: Choose different alert styles
#### Content Blocks
* **Headings**: Create section headers (H1, H2, H3)
* **Paragraphs**: Add plain text paragraphs
* **Lists**: Create bulleted lists (•), numbered lists (1.), and checkboxes (☐)
* **Tables**: Create data tables with grid layout
#### Media Blocks
* **Images**: Insert images or GIFs to your notebook
* **Video Clips**: Add video content to your analysis
* **Audio**: Include audio files for multimedia notebooks
* **File Attachments**: Attach documents and other files
## Key Features
### Auto-Save and Persistence
* **Real-time Save**: Changes are saved automatically
* **No Manual Save**: No need to click save buttons
* **Cross-session**: Notebook persists across browser sessions
* **Team Sync**: Changes sync with team members
### Collaborative Features
* **Multiple Users**: Multiple team members can work simultaneously
* **Live Cursors**: See where others are working
* **Change Indicators**: Visual indicators for recent changes
* **Auto-sync**: Changes sync automatically across users
### Enhanced Over Jupyter
* **Rich Media**: Support for images, videos, and audio
* **Interactive Lists**: Checkbox lists and interactive elements
* **Alert Blocks**: Highlight important information
* **Better UI**: Modern, intuitive interface
* **Team Collaboration**: Real-time collaborative editing
## Best Practices
### Notebook Organization
* **Clear Structure**: Organize notebooks logically with headings
* **Descriptive Names**: Use clear, descriptive names
* **Documentation**: Add markdown cells for documentation
* **Modular Code**: Break code into logical sections
### Content Creation
* **Use Alerts**: Highlight important information with alert blocks
* **Rich Media**: Include images and videos to enhance analysis
* **Interactive Elements**: Use checkboxes and lists for organization
* **Clear Documentation**: Document your analysis process
### Collaboration
* **Communication**: Communicate with team members
* **Clear Comments**: Add clear comments to your code
* **Regular Updates**: Keep notebooks current and updated
* **Share Knowledge**: Use notebooks to share knowledge
## Next Steps
Now that you've created your notebook:
1. **Add Content**: Start adding code blocks and documentation
2. **Run Code**: Learn about [Running Code in Notebook](/guides/data-analysis/run-code-in-notebook)
3. **Use Libraries**: Explore [Supported Python Libraries](/guides/data-analysis/supported-python-libraries)
4. **Publish**: [Publish Your Notebook](/guides/data-analysis/publish-notebook) to share with others
Happy analyzing!