> ## Documentation Index
> Fetch the complete documentation index at: https://docs.nikaplanet.com/llms.txt
> Use this file to discover all available pages before exploring further.

# Start Machine

> Learn how to start and manage VM kernels for Nika notebooks with different CPU and GPU configurations

Learn how to start and manage VM kernels for your Nika notebooks. Choose from different CPU and GPU configurations to match your analysis needs.

## Step 1: Select Machine Type

### Available Configurations

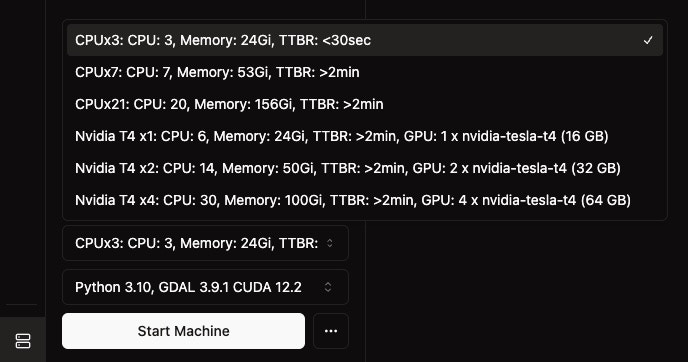
Choose from these pre-configured options:

#### CPU Machines

| Machine    | CPU Cores | RAM    | Ready Time |
| ---------- | --------- | ------ | ---------- |
| **CPUx3**  | 3         | 24 GB  | \<30 sec   |
| **CPUx7**  | 7         | 53 GB  | >2 min     |
| **CPUx20** | 20        | 156 GB | >2 min     |
| **CPUx42** | 42        | 326 GB | >2 min     |

#### GPU Machines

| Machine            | CPU Cores | RAM    | GPU         | GPU Memory | Ready Time |
| ------------------ | --------- | ------ | ----------- | ---------- | ---------- |
| **Nvidia T4 x1**   | 6         | 24 GB  | 1x Tesla T4 | 16 GB      | >2 min     |
| **Nvidia T4 x2**   | 14        | 50 GB  | 2x Tesla T4 | 32 GB      | >2 min     |
| **Nvidia T4 x4**   | 30        | 100 GB | 4x Tesla T4 | 64 GB      | >2 min     |
| **Nvidia H100 x1** | 24        | 210 GB | 1x H100     | 80 GB      | >2 min     |

<img src="https://mintcdn.com/nika/1GHRu8T5UOOZC3py/guides/data-analysis/start-machine-3.jpg?fit=max&auto=format&n=1GHRu8T5UOOZC3py&q=85&s=80fdfaa759f03b84c97ca9c6194c69bd" alt="Machine Selection Options" width="688" height="362" data-path="guides/data-analysis/start-machine-3.jpg" />

## Step 2: Start Your Machine

### Quick Start

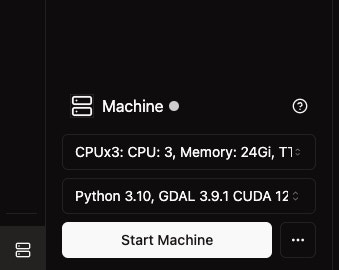
1. **Select Configuration**: Choose your desired machine type from the dropdown
2. **Click "Start Machine"**: Click the prominent white button
3. **Wait for Ready**: Machine will be ready in 15-40 seconds depending on type

### Start Times

* **CPUx3**: Under 30 seconds (fastest)
* **All other machines**: Over 2 minutes (varies by availability)
<img src="https://mintcdn.com/nika/1GHRu8T5UOOZC3py/guides/data-analysis/start-machine-1.jpg?fit=max&auto=format&n=1GHRu8T5UOOZC3py&q=85&s=498444324ad6d62eac06e333ccc8962e" alt="Start Machine Button" width="339" height="270" data-path="guides/data-analysis/start-machine-1.jpg" />

## Step 3: Monitor Machine Status

### Status Indicators

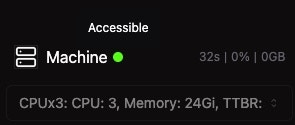
Your machine status is shown as a colored indicator dot in the machine panel and the bottom-left icon. The color reflects the current state:
<style>
  {`
    .status-card {
      display: flex;
      align-items: center;
      gap: 10px;
      padding: 10px 14px;
      border-radius: 8px;
    }
    .status-card-green {
      background-color: #f0fdf4;
      border: 1px solid #bbf7d0;
    }
    .status-card-orange {
      background-color: #fffbeb;
      border: 1px solid #fde68a;
    }
    .status-card-red {
      background-color: #fef2f2;
      border: 1px solid #fecaca;
    }
    .status-card-grey {
      background-color: #f9fafb;
      border: 1px solid #e5e7eb;
    }
    .dark .status-card-green {
      background-color: #052e16;
      border-color: #166534;
    }
    .dark .status-card-orange {
      background-color: #422006;
      border-color: #854d0e;
    }
    .dark .status-card-red {
      background-color: #350a0a;
      border-color: #991b1b;
    }
    .dark .status-card-grey {
      background-color: #1a1a1a;
      border-color: #333333;
    }
    `}
</style>

<div style={{ display: 'flex', flexDirection: 'column', gap: '12px', margin: '16px 0' }}>
  <div className="status-card status-card-green">
    <span style={{ display: 'inline-block', width: '12px', height: '12px', borderRadius: '50%', backgroundColor: '#00FF00', flexShrink: 0 }} />

    <div>
      <strong>Green — Accessible</strong><br />
      Machine is running and ready to execute code.
    </div>
  </div>

  <div className="status-card status-card-orange">
    <span style={{ display: 'inline-block', width: '12px', height: '12px', borderRadius: '50%', backgroundColor: '#FFA500', flexShrink: 0 }} />

    <div>
      <strong>Orange — Starting</strong><br />
      Machine is being provisioned. Applies to <em>Pending</em>, <em>Running</em> (container starting), and <em>Succeeded</em> states. Wait for it to turn green.
    </div>
  </div>

  <div className="status-card status-card-red">
    <span style={{ display: 'inline-block', width: '12px', height: '12px', borderRadius: '50%', backgroundColor: '#FF0000', flexShrink: 0 }} />

    <div>
      <strong>Red — Error</strong><br />
      Something went wrong. This covers:

      <ul style={{ margin: '4px 0 0 0', paddingLeft: '18px' }}>
        <li><strong>Failed</strong> — the machine crashed or encountered an error.</li>
        <li><strong>Unavailable</strong> — the required cloud compute resources could not be provisioned after multiple auto-retries on NikaPlanet's backend. It could be due to overwhelming demand for this machine type by all cloud users. You will have to wait for the supply to increased by cloud service provider.</li>
      </ul>
    </div>
  </div>

  <div className="status-card status-card-grey">
    <span style={{ display: 'inline-block', width: '12px', height: '12px', borderRadius: '50%', backgroundColor: '#D3D3D3', flexShrink: 0 }} />

    <div>
      <strong>Grey — Terminated</strong><br />
      Machine is stopped. No compute charges apply.
    </div>
  </div>
</div>

### Viewing Status

#### Method 1: Machine Panel

* **Hover over the indicator dot**: Shows detailed status information
* **View metrics**: Uptime, CPU usage, memory usage
* **Real-time updates**: Status updates automatically every 10 seconds

<img src="https://mintcdn.com/nika/1GHRu8T5UOOZC3py/guides/data-analysis/start-machine-2.jpg?fit=max&auto=format&n=1GHRu8T5UOOZC3py&q=85&s=043923e2af2706b66b8aab08f1eccf7d" alt="Machine Status Panel" width="295" height="125" data-path="guides/data-analysis/start-machine-2.jpg" />

#### Method 2: Bottom Left Icon

* **Hover over machine icon**: Quick status overview
* **Visual indicator**: Colored dot matches the states above
* **Easy access**: Always visible in workspace

<img src="https://mintcdn.com/nika/1GHRu8T5UOOZC3py/guides/data-analysis/start-machine-4.jpg?fit=max&auto=format&n=1GHRu8T5UOOZC3py&q=85&s=12afa77e06920fd68fb3234db0e03eeb" alt="Bottom Left Status Icon" width="231" height="70" data-path="guides/data-analysis/start-machine-4.jpg" />

## Step 4: Stop Machine

### Stop Process

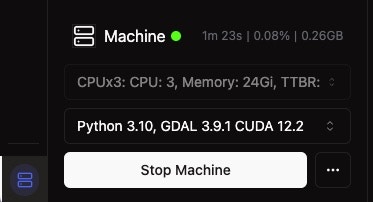
1. **Click "Stop Machine"**: Click the white button in machine panel
2. **Immediate Stop**: Machine stops running immediately
3. **No Compute Cost**: No charges after stopping

### Benefits of Stopping

* **Save Resources**: Stop when not actively using
* **Cost Control**: No charges when stopped
* **Quick Restart**: Can restart anytime needed
<img src="https://mintcdn.com/nika/1GHRu8T5UOOZC3py/guides/data-analysis/start-machine-5.jpg?fit=max&auto=format&n=1GHRu8T5UOOZC3py&q=85&s=766364524b7421914992840090cd81f0" alt="Stop Machine Button" width="373" height="202" data-path="guides/data-analysis/start-machine-5.jpg" />

## Best Practices

### Machine Selection

* **Start Small**: Begin with CPUx3 for simple analysis
* **Scale Up**: Upgrade to larger machines for complex tasks
* **GPU for ML**: Use GPU machines for machine learning workloads
* **Cost Consideration**: Larger machines consume more resources

### Resource Management

* **Stop When Done**: Stop machines when not actively working
* **Monitor Usage**: Check status regularly
* **Plan Sessions**: Start machines when ready to work

## Next Steps

Now that your machine is running:

1. **Start Coding**: Begin your analysis in the notebook
2. **Load Data**: Access your workspace files
3. **Use GPU**: Leverage GPU acceleration if available
4. **Monitor Performance**: Keep an eye on resource usage

Happy computing!
