> ## Documentation Index
> Fetch the complete documentation index at: https://docs.nikaplanet.com/llms.txt
> Use this file to discover all available pages before exploring further.
# Create a Labeling Job
> Learn how to create an image labeling job, configure modes, and set up instructions for your team
Learn how to create a new labeling job in Nika Labeler, switch between labeling modes, and configure instructions that your team members will see when working on annotations.
## Step 1: Create a New Labeling Job
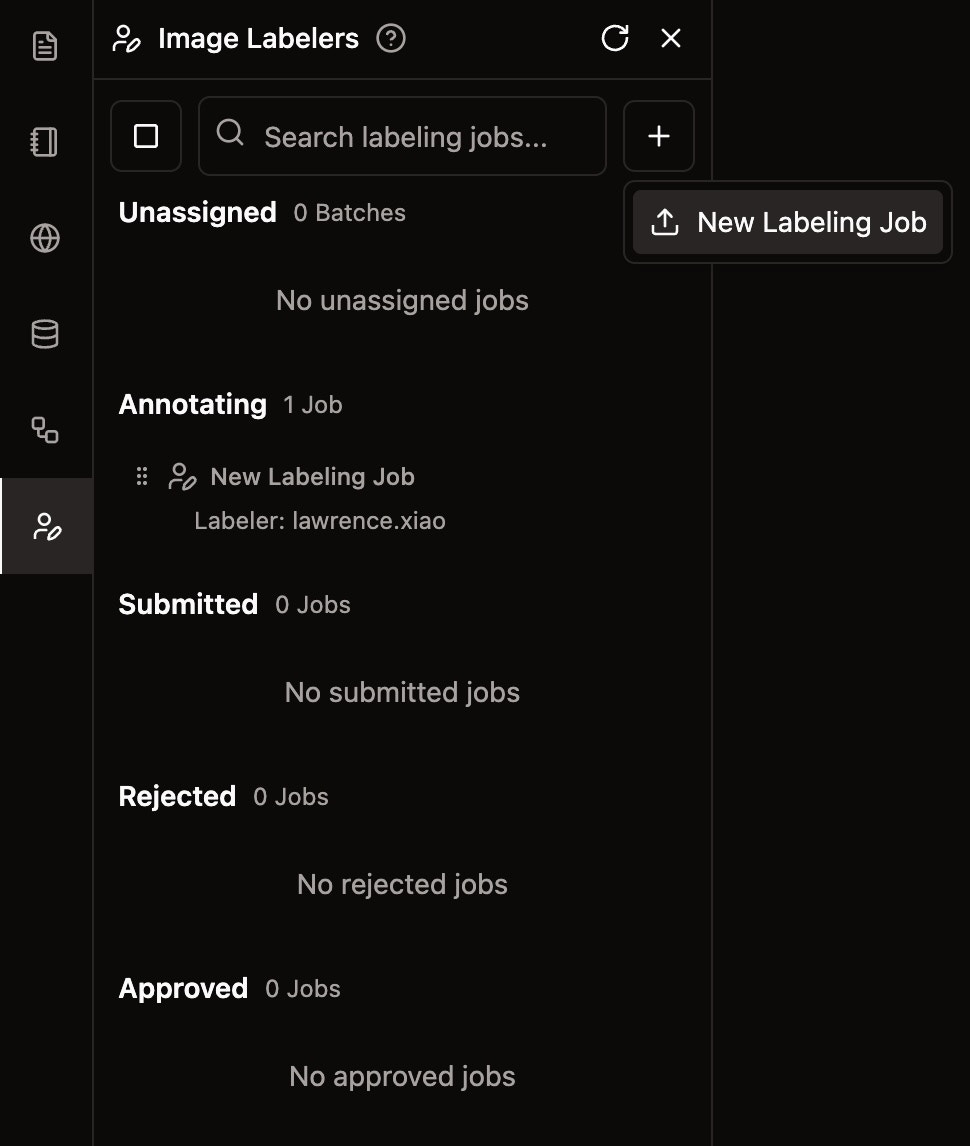
1. **Navigate to Nika Labeler**: In NikaWorkspace, click on the Labeler icon in the left sidebar
2. **Create New Job**: Click the "+" button to create a new labeling job
3. **Configure Job Settings**: Set up your job name and initial configuration
 ## Step 2: Switch Between Labeling Modes
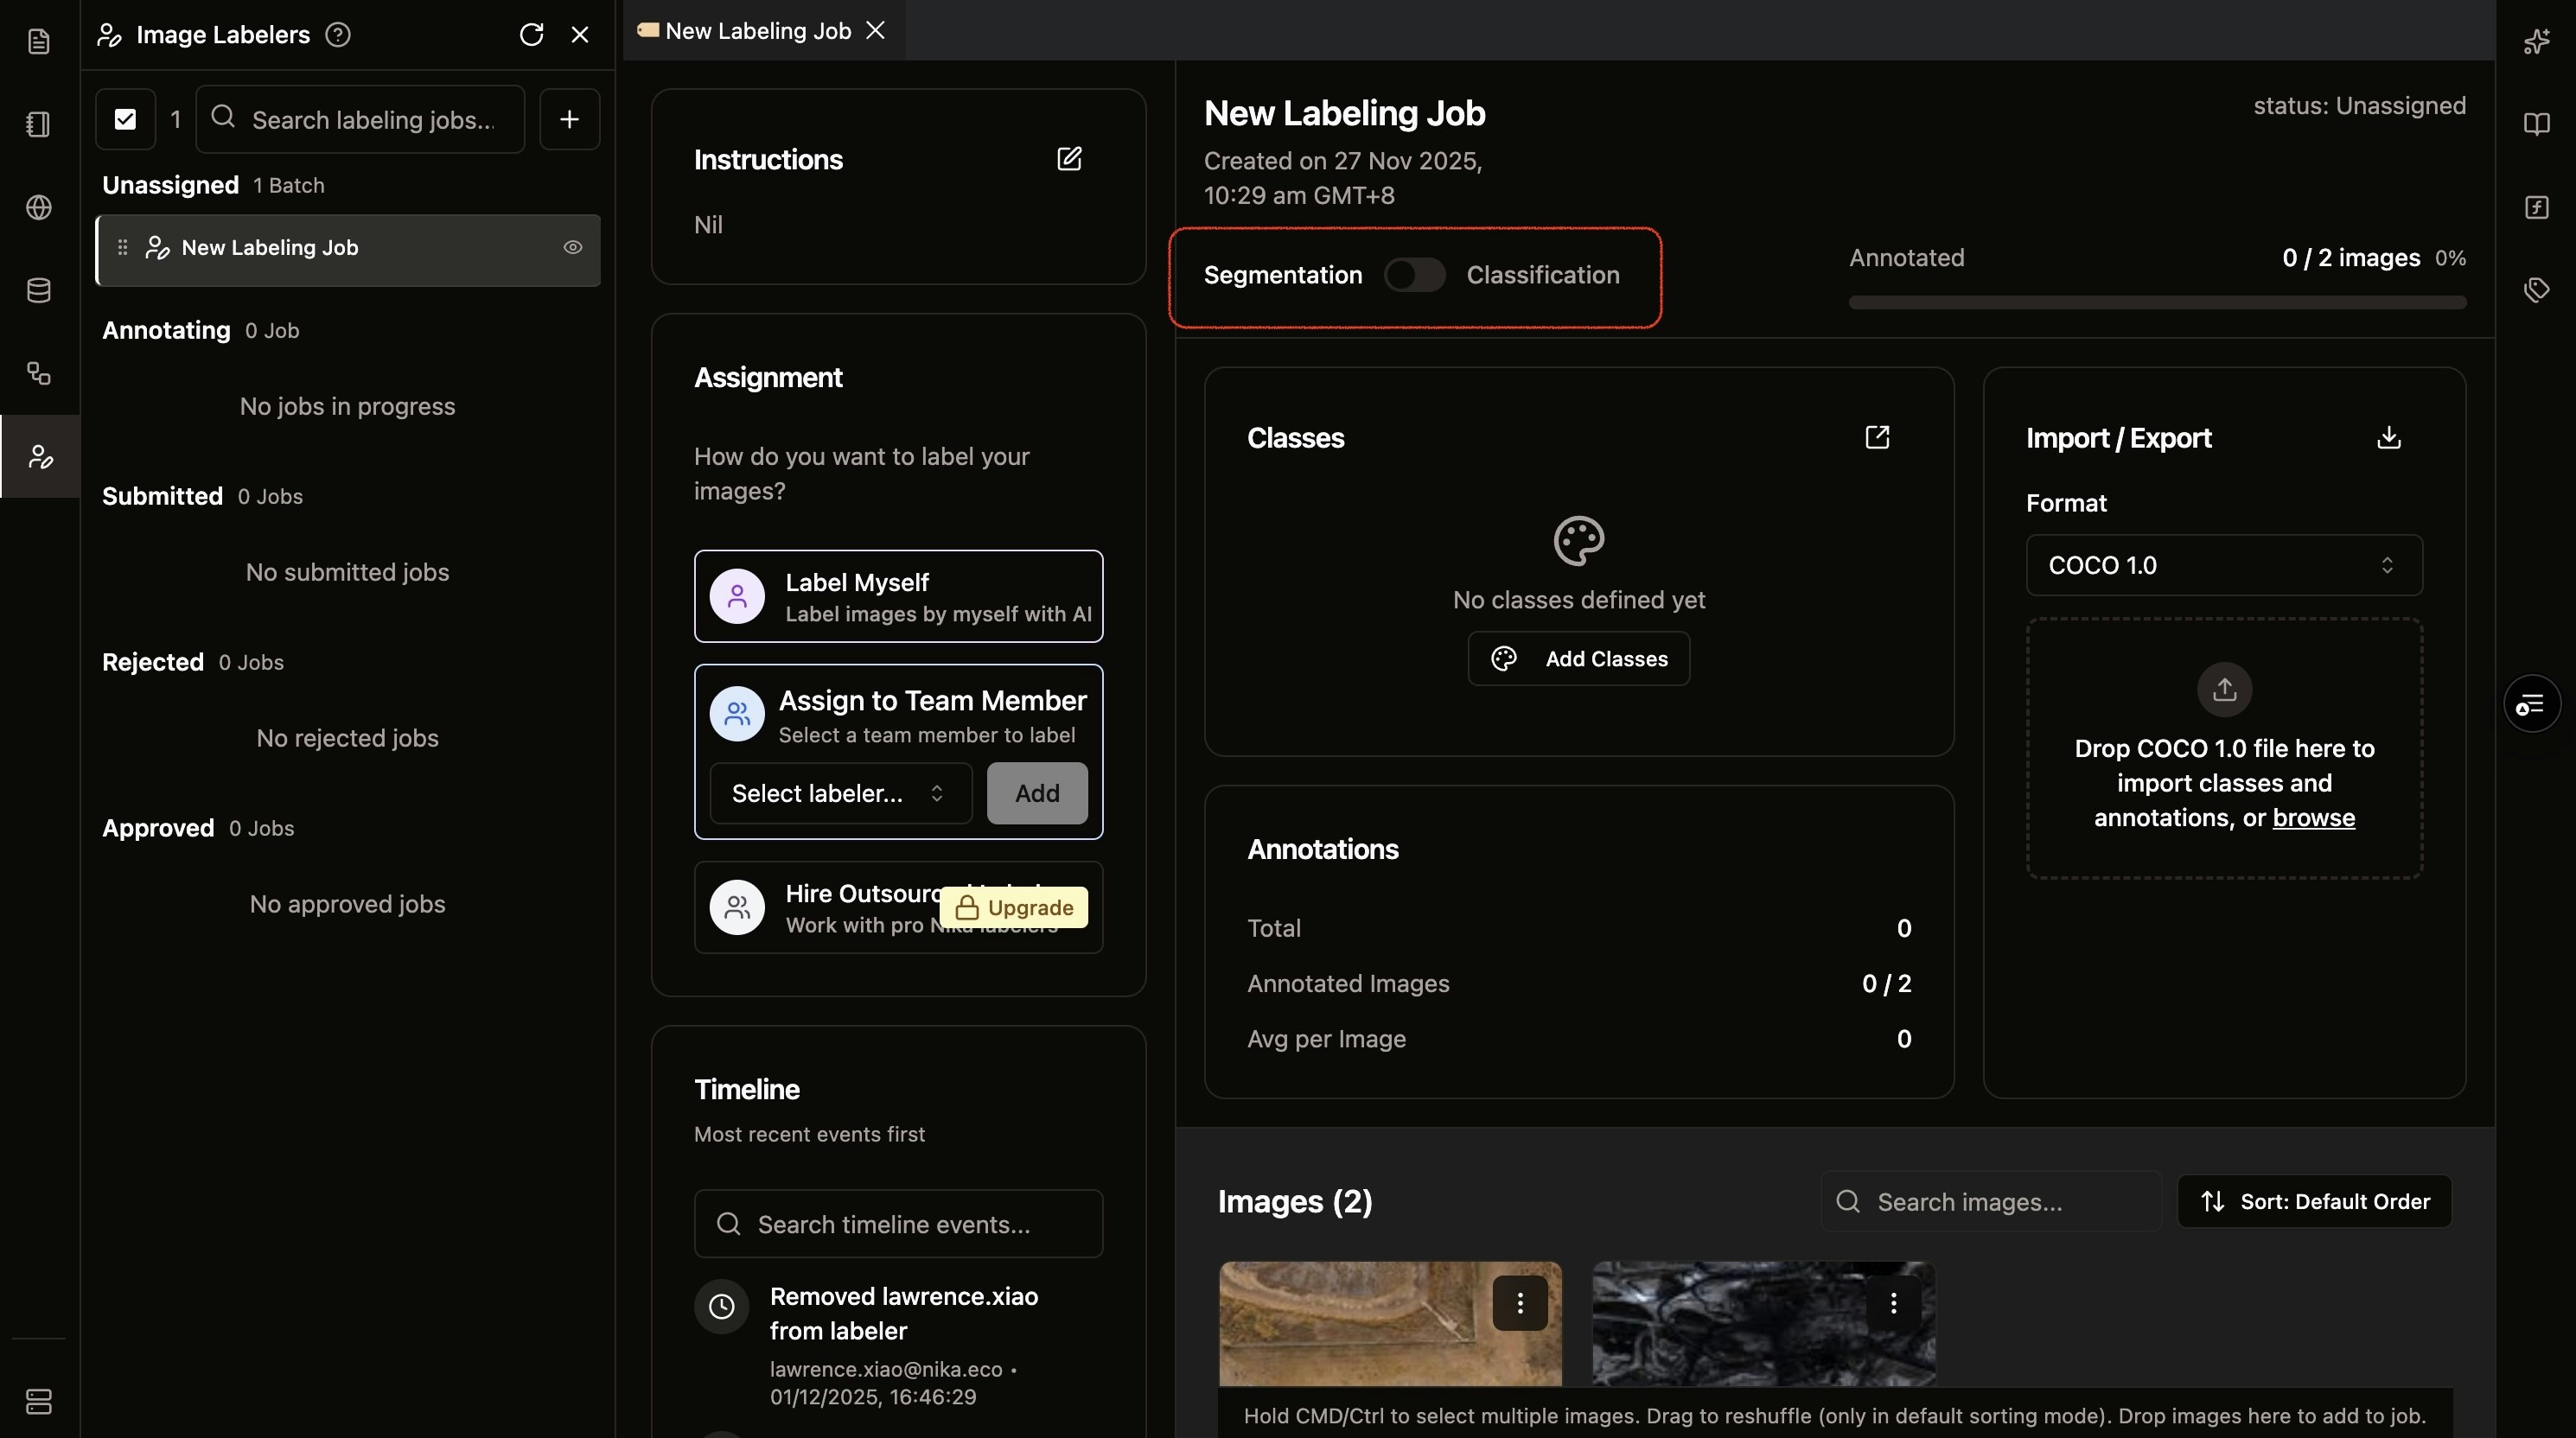
Nika Labeler supports different labeling modes to accommodate different annotation workflows. You can easily switch between modes using the switch.
## Step 2: Switch Between Labeling Modes
Nika Labeler supports different labeling modes to accommodate different annotation workflows. You can easily switch between modes using the switch.
 ### Available Labeling Modes
* **Classification Mode**: For categorizing entire images with 1 or more classes
* **Segmentation Mode**: For bounding box, polygon, linestring drawing on images with associated classes
Note: you can still switch mode after images are uploaded. However, all existing annotations will be gone.
## Step 3: Edit Job Instructions
Clear instructions are essential for consistent annotations. Set up detailed guidance that assignees will reference while labeling.
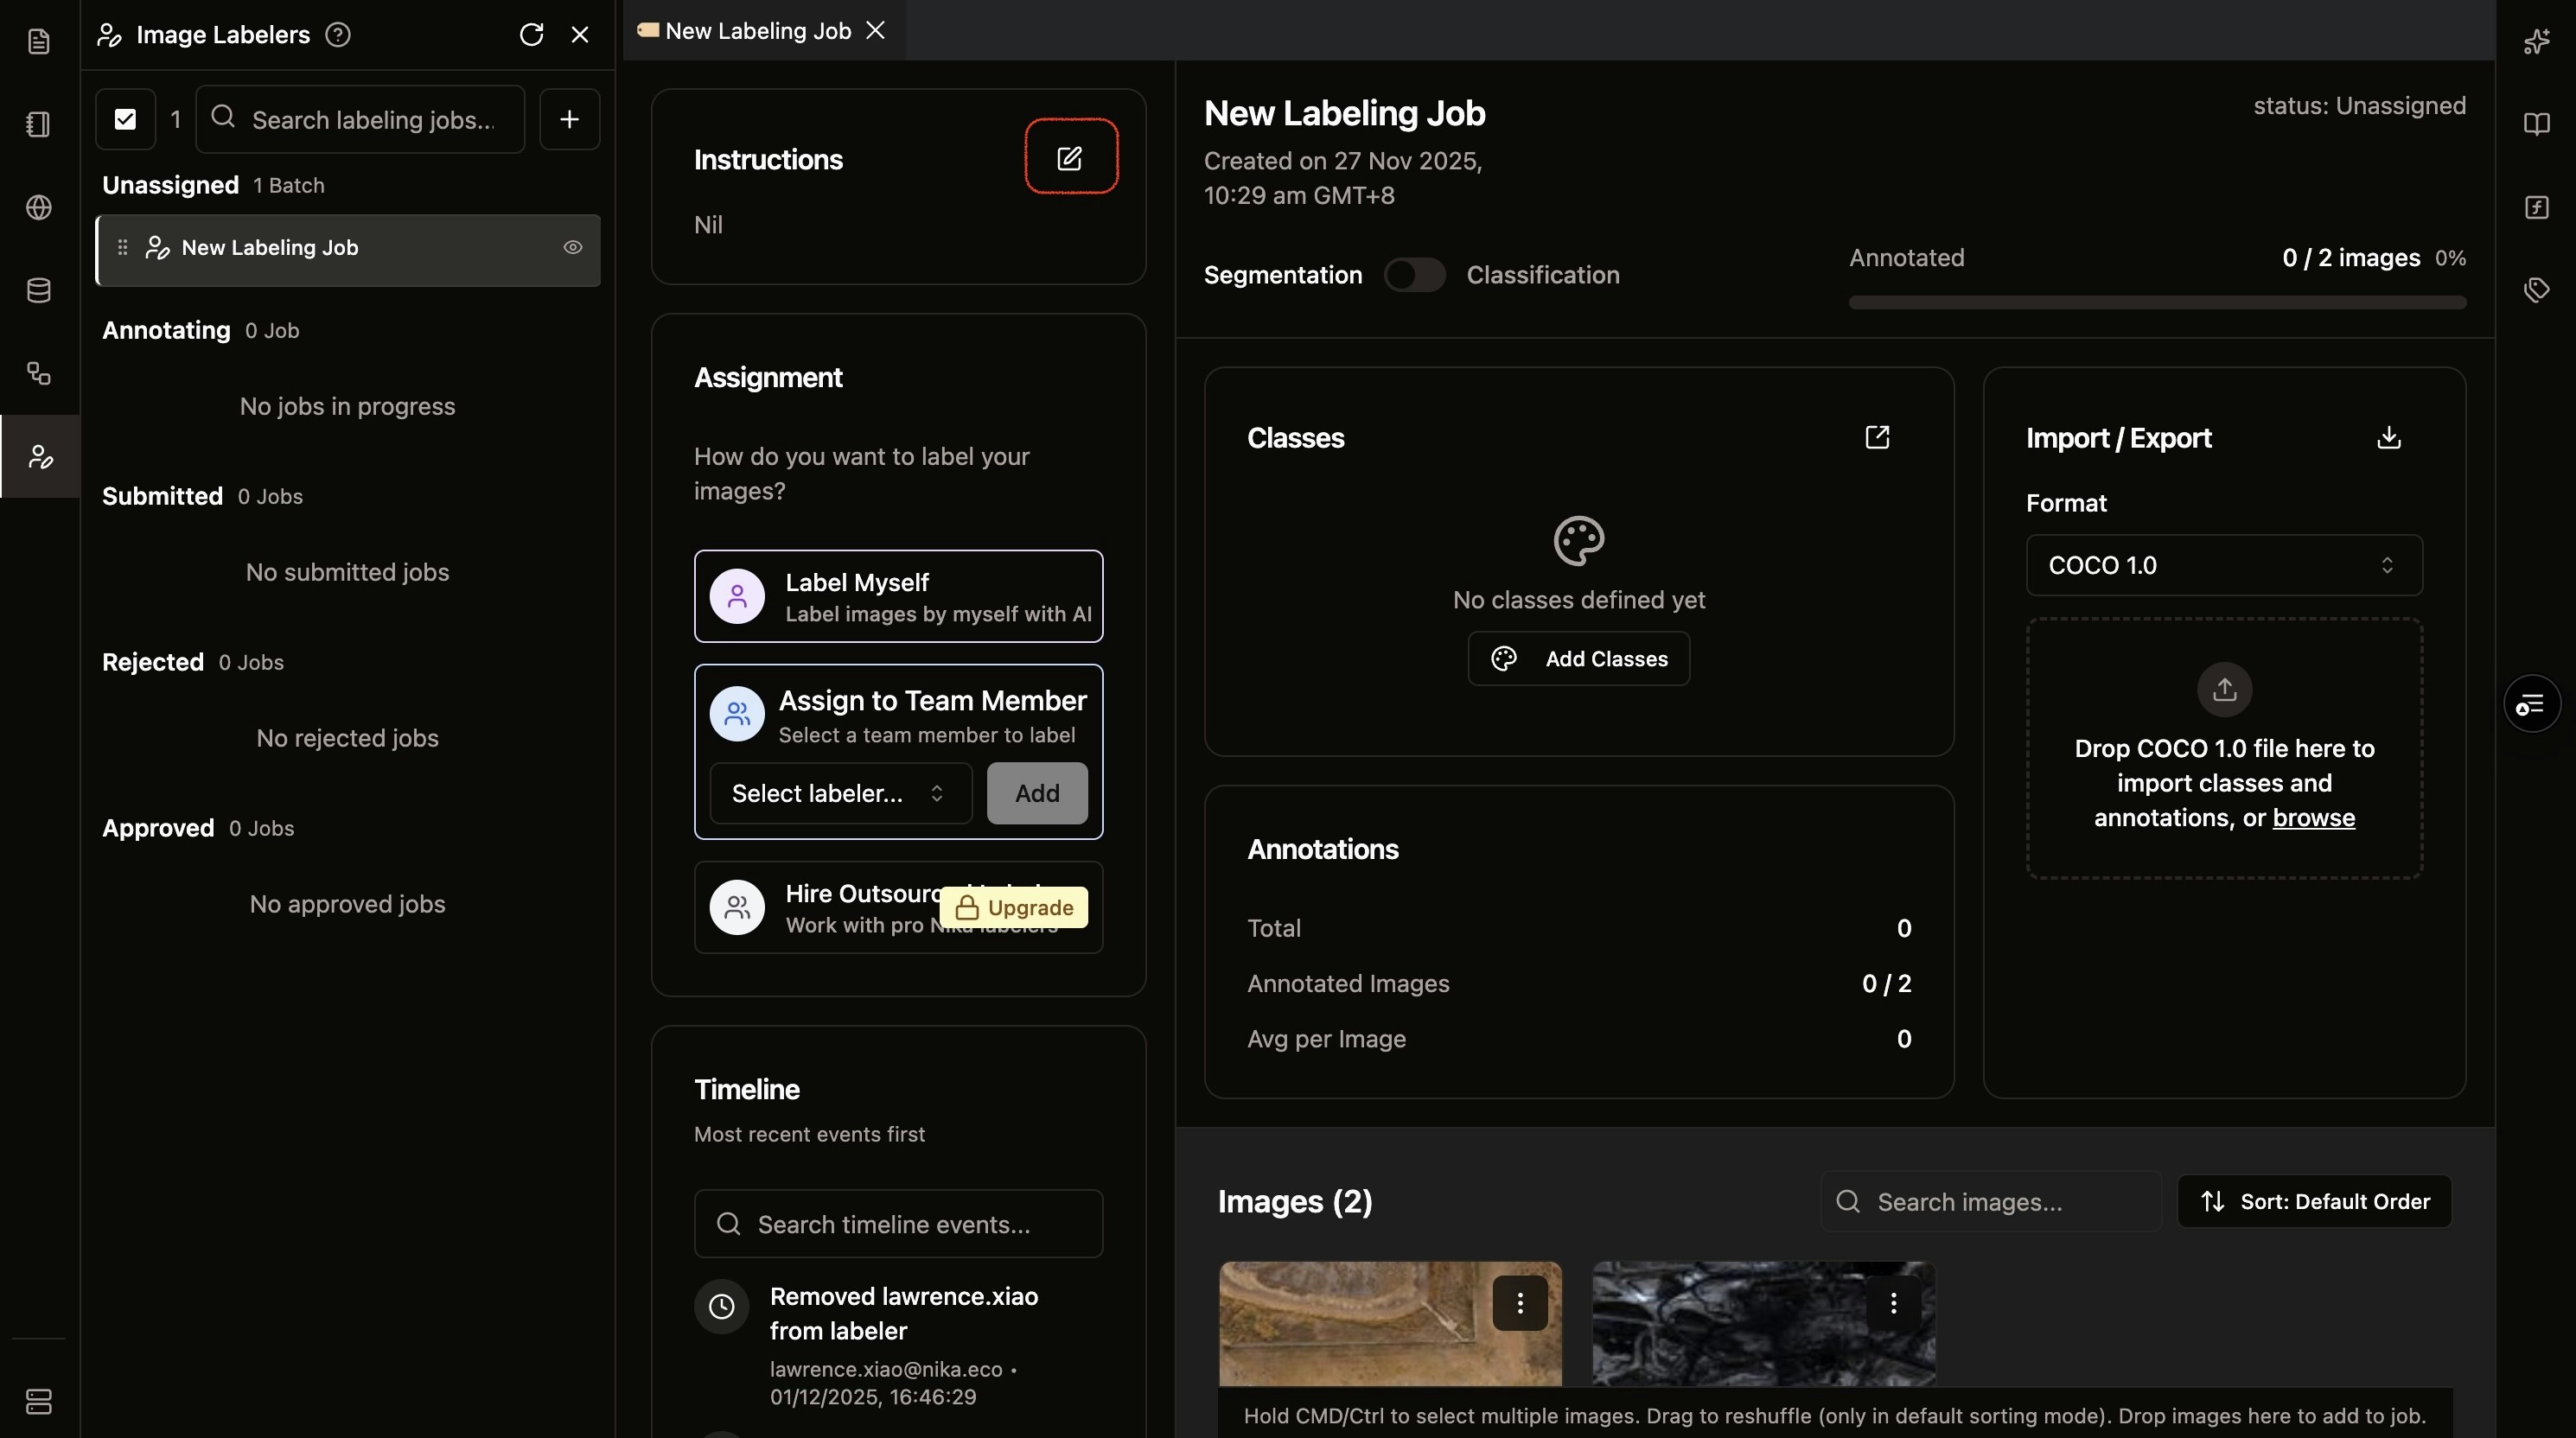
1. **Click Edit Instructions**: Click the instruction editor button to open the instruction panel
### Available Labeling Modes
* **Classification Mode**: For categorizing entire images with 1 or more classes
* **Segmentation Mode**: For bounding box, polygon, linestring drawing on images with associated classes
Note: you can still switch mode after images are uploaded. However, all existing annotations will be gone.
## Step 3: Edit Job Instructions
Clear instructions are essential for consistent annotations. Set up detailed guidance that assignees will reference while labeling.
1. **Click Edit Instructions**: Click the instruction editor button to open the instruction panel
 2. **Write Clear Guidelines**: Provide detailed instructions for your labeling task
* Describe what to annotate
* Include examples of edge cases
* Specify quality standards
* Add any project-specific requirements
3. **Save Instructions**: Click "✅" to finalize your instructions
2. **Write Clear Guidelines**: Provide detailed instructions for your labeling task
* Describe what to annotate
* Include examples of edge cases
* Specify quality standards
* Add any project-specific requirements
3. **Save Instructions**: Click "✅" to finalize your instructions
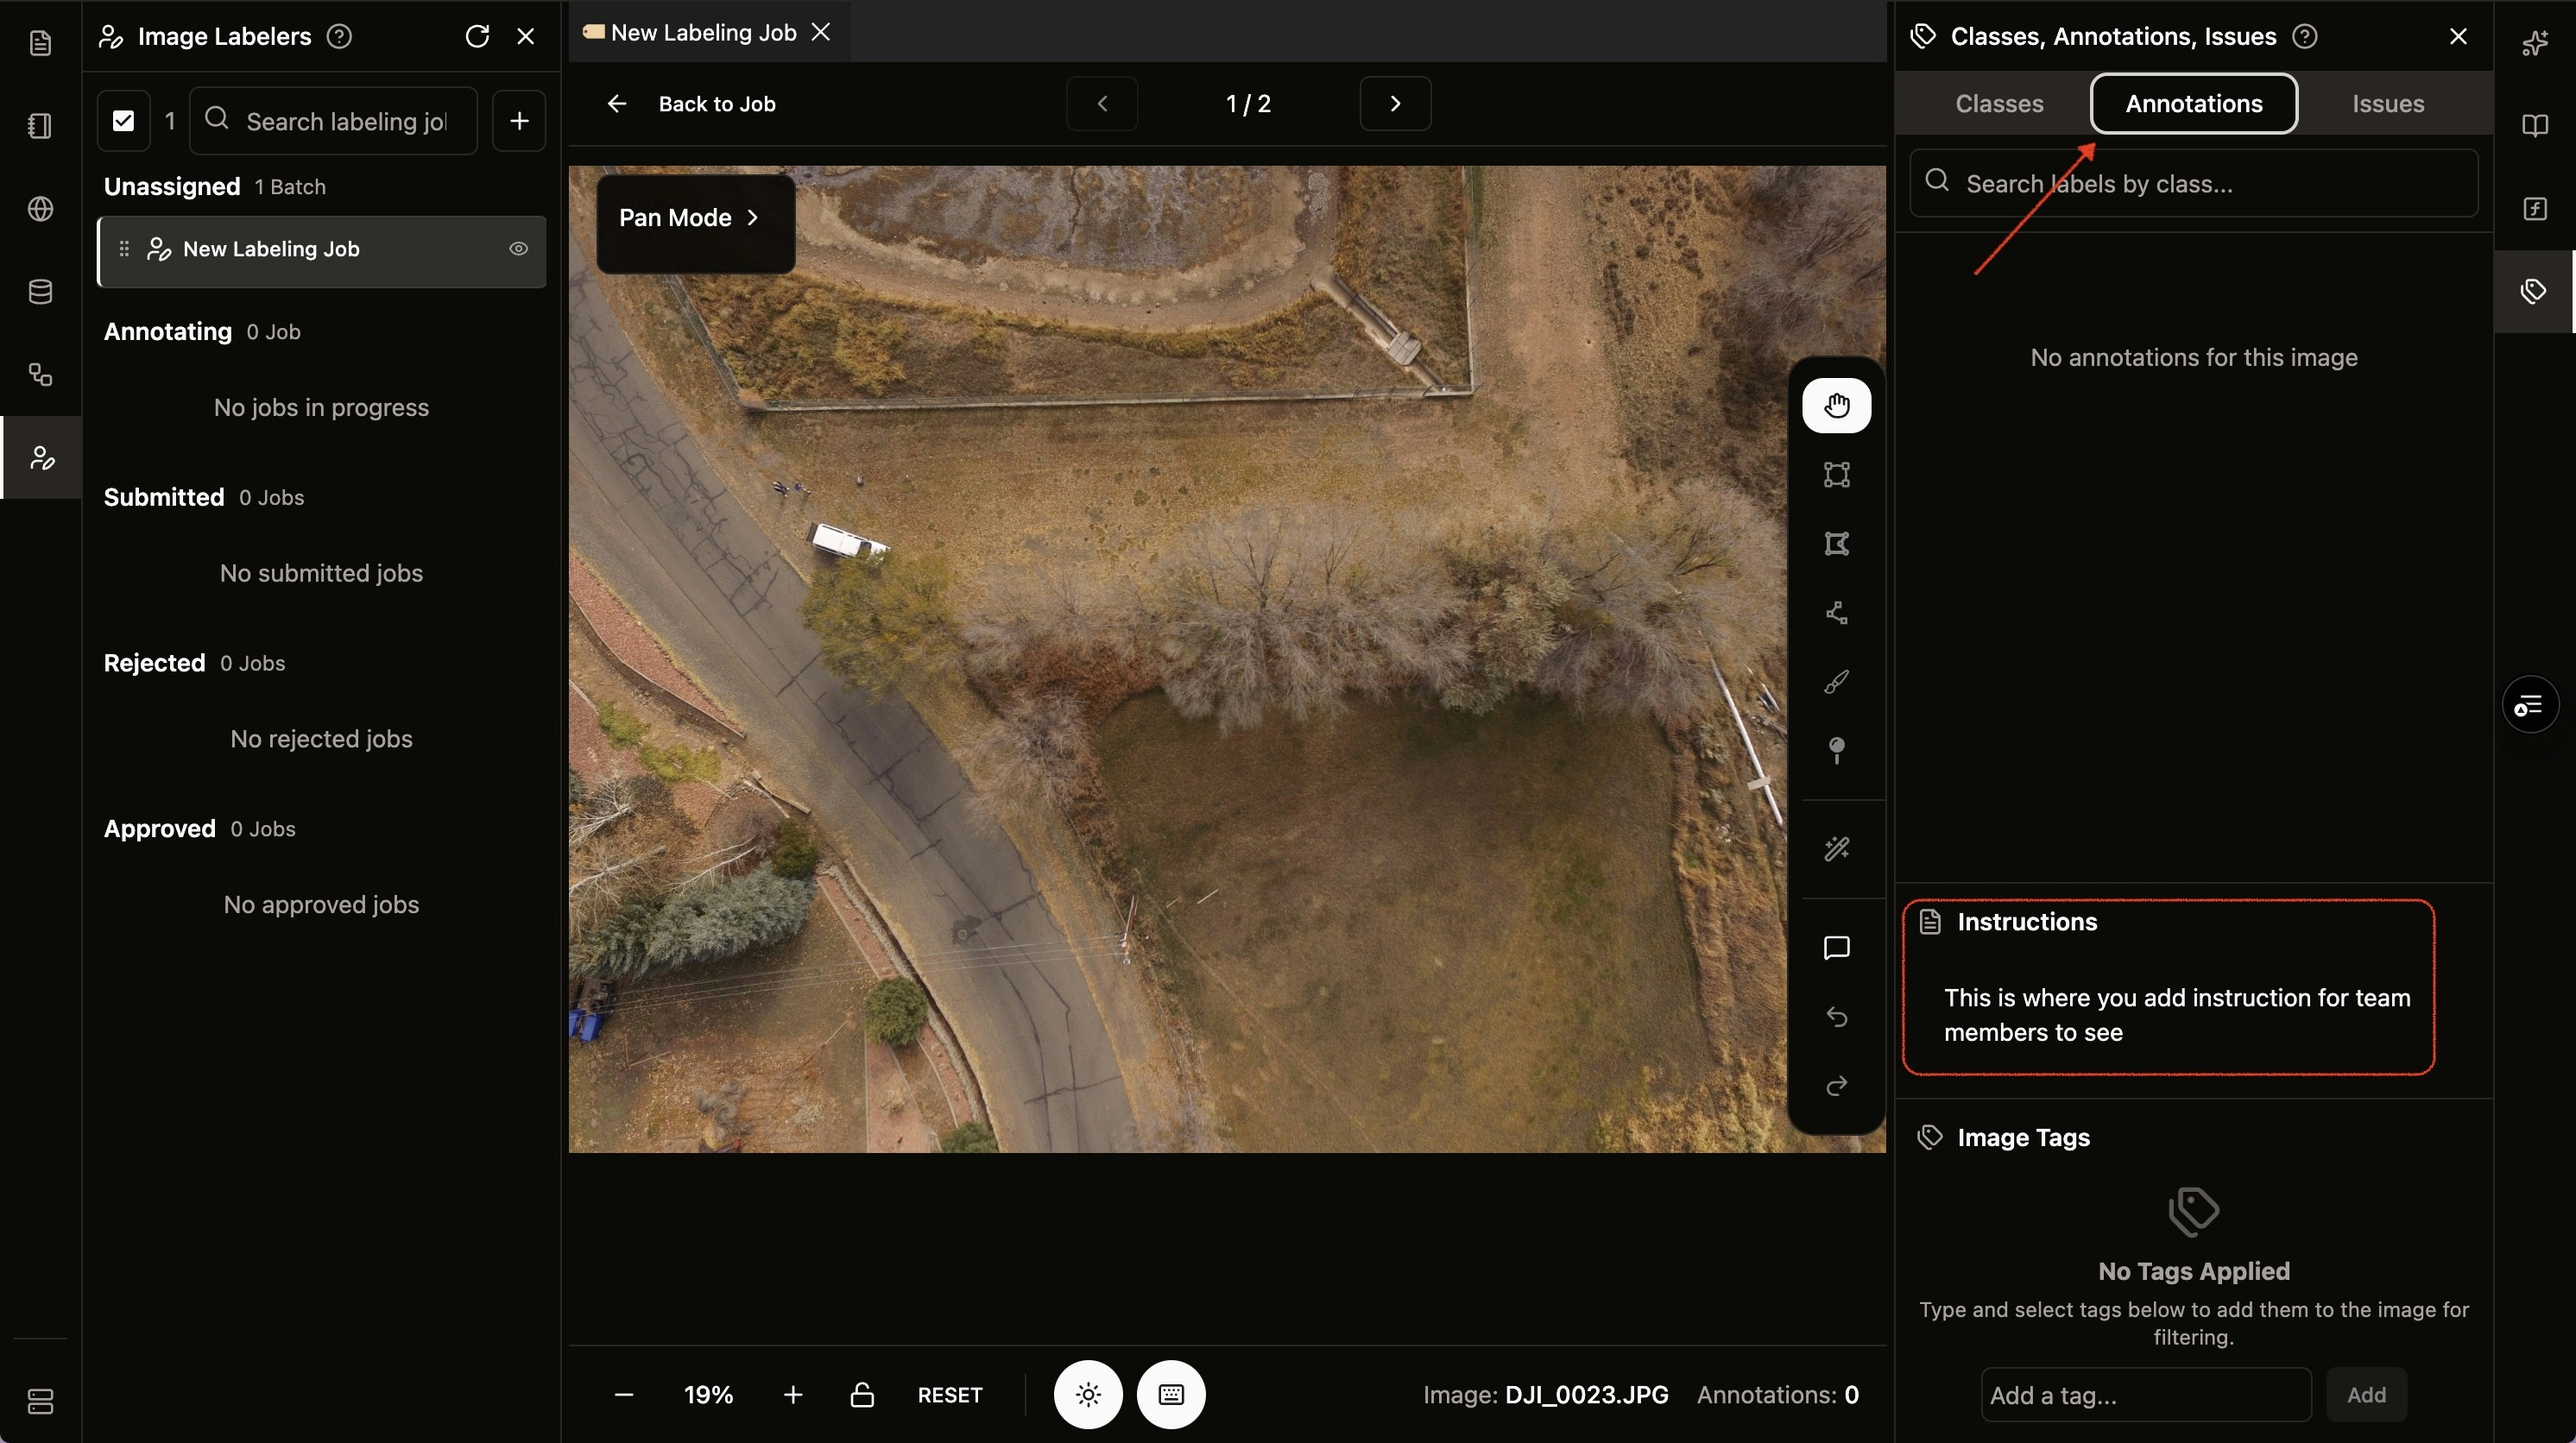
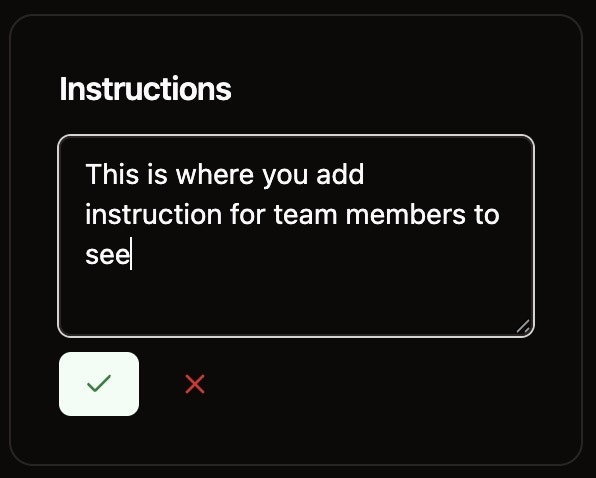 After saving, your instructions will be visible to assignees in the right panel's annotations tab. This ensures they have constant access to guidelines while working.
 ## Step 4: Add Images to Your Labeling Job
Now that your job is configured with instructions, it's time to add the images that need to be labeled. Nika Labeler provides two convenient ways to add images to your job.
## Step 4: Add Images to Your Labeling Job
Now that your job is configured with instructions, it's time to add the images that need to be labeled. Nika Labeler provides two convenient ways to add images to your job.
 ### Method 1: Drag and drop from Nika File Storage
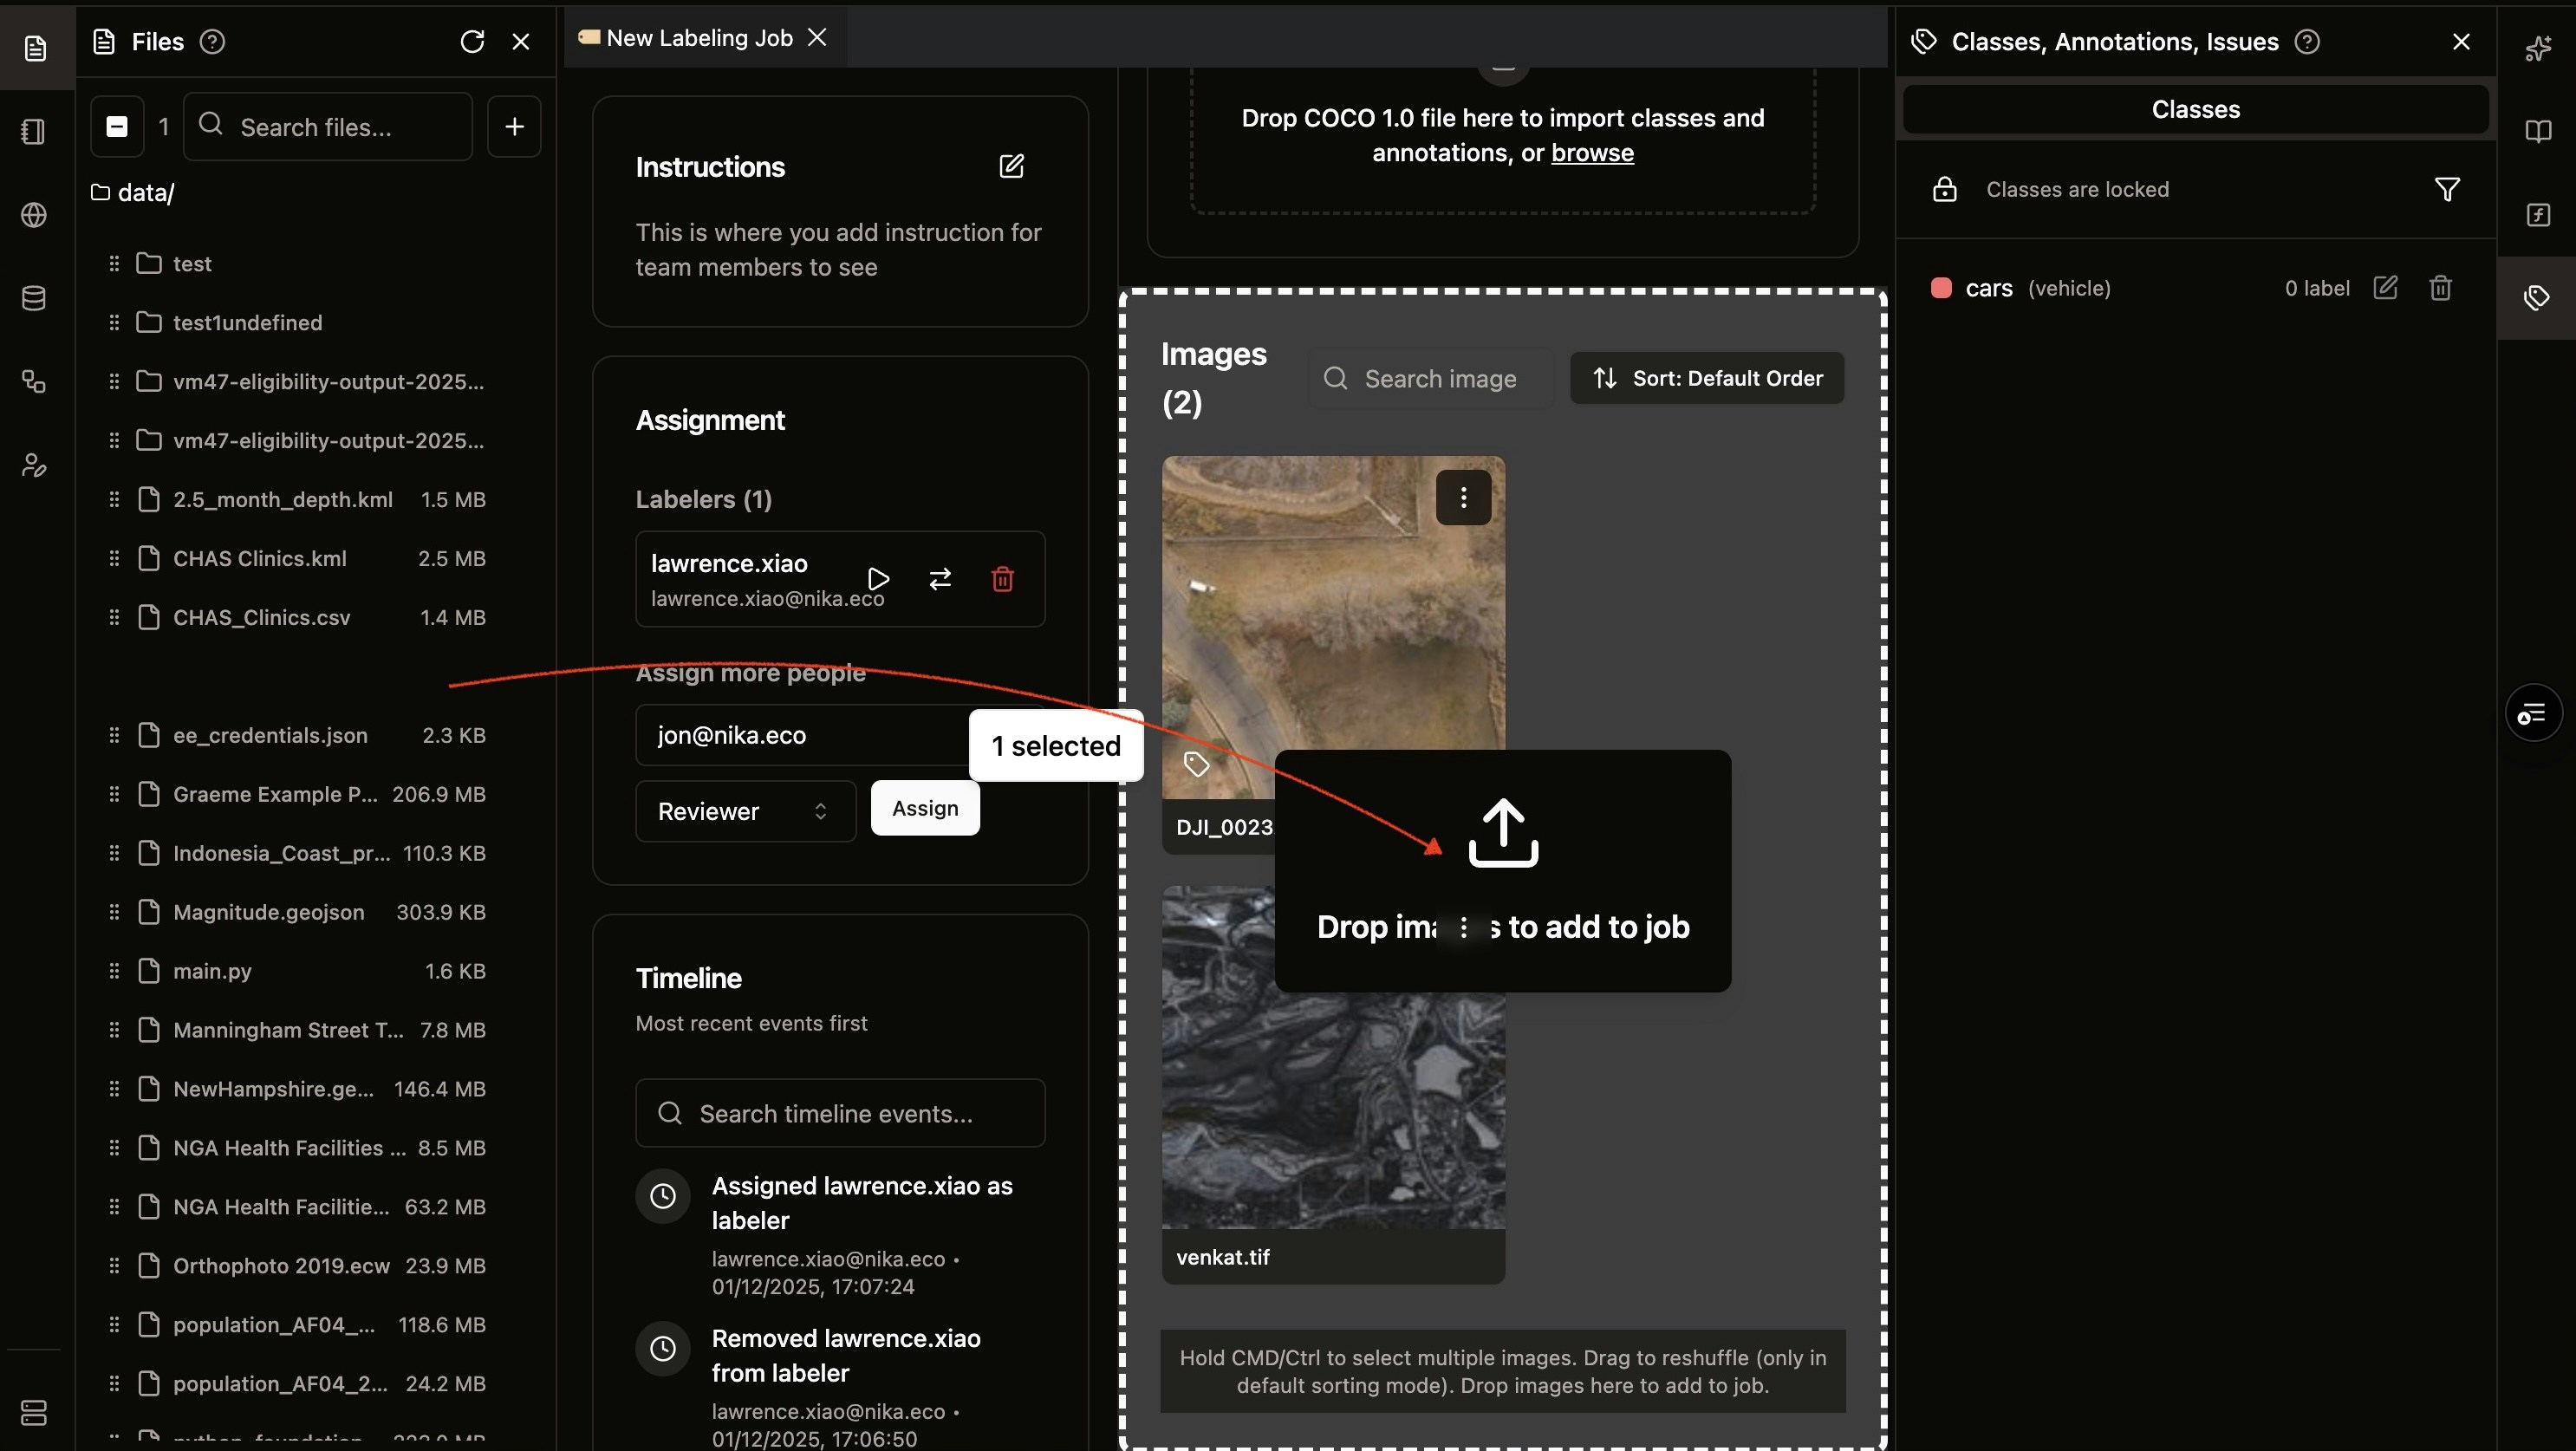
1. **Open File Storage**: Access your files from the left sidebar in NikaWorkspace
2. **Select Files or Folders**: Choose the images or folders containing images you want to label
3. **Drag to Images Section**: Drag and drop the selected files or folders directly to the images section of your labeling job
This method is ideal when your images are already uploaded to Nika's cloud storage.
### Method 2: Drag and drop from Desktop
1. **Locate Files on Desktop**: Find the images on your local computer
2. **Drag Directly**: Drag the files from your desktop (or any local folder) directly to the images section
3. **Upload Automatically**: The files will be uploaded and added to your labeling job automatically
This method is perfect for quickly adding new images without pre-uploading them to Nika File Storage.
## Job Ready for Assignment
Your labeling job is now configured and ready to be assigned to team members! The job includes:
✅ Configured labeling mode\
✅ Clear instructions for assignees\
✅ Proper setup for consistent annotations
Happy labeling!
### Method 1: Drag and drop from Nika File Storage
1. **Open File Storage**: Access your files from the left sidebar in NikaWorkspace
2. **Select Files or Folders**: Choose the images or folders containing images you want to label
3. **Drag to Images Section**: Drag and drop the selected files or folders directly to the images section of your labeling job
This method is ideal when your images are already uploaded to Nika's cloud storage.
### Method 2: Drag and drop from Desktop
1. **Locate Files on Desktop**: Find the images on your local computer
2. **Drag Directly**: Drag the files from your desktop (or any local folder) directly to the images section
3. **Upload Automatically**: The files will be uploaded and added to your labeling job automatically
This method is perfect for quickly adding new images without pre-uploading them to Nika File Storage.
## Job Ready for Assignment
Your labeling job is now configured and ready to be assigned to team members! The job includes:
✅ Configured labeling mode\
✅ Clear instructions for assignees\
✅ Proper setup for consistent annotations
Happy labeling!