> ## Documentation Index
> Fetch the complete documentation index at: https://docs.nikaplanet.com/llms.txt
> Use this file to discover all available pages before exploring further.
# Geospatial Analysis
> Learn how to perform geospatial analysis with NikaWorkspace in 7 easy steps
## Geospatial Analysis
Learn how to perform geospatial analysis with NikaWorkspace in 7 easy steps. This tutorial will guide you from creating your first notebook to publishing your analysis results.
## Step 1: Create Your First Notebook
### Quick Start
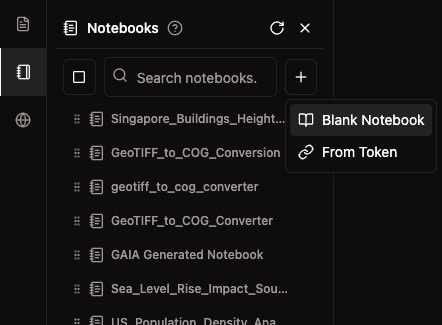
1. **Navigate to Notebooks**: Click on "Notebooks" in the left sidebar
2. **Click "+" Button**: Click the "+" button in the notebook list
3. **Select "Blank Notebook"**: Choose "Blank Notebook" from the dropdown menu
4. **Auto-Save Enabled**: Your notebook is automatically saved
### Rename Your Notebook
* **Click Title Area**: Click on the notebook title at the top left
* **Type New Name**: Enter a descriptive name like "Geospatial Analysis Project"
* **Professional Naming**: Use clear, descriptive names for your projects
 ## Step 2: Start Your Machine
### Select Machine Configuration
Choose from available configurations:
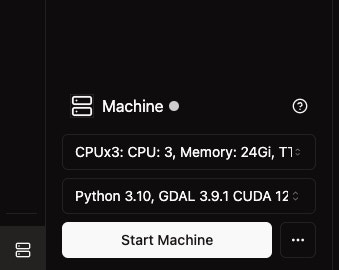
* **CPUx3**: 3 CPU cores, 24GB RAM, ready in under 30 seconds (recommended for beginners)
* **CPUx7**: 7 CPU cores, 53GB RAM, ready in over 2 minutes
* **GPU Machines**: For machine learning and complex processing
### Start Machine
1. **Click "Start Machine"**: Click the prominent white button
2. **Wait for Ready**: Machine will be ready in 15-40 seconds
3. **Monitor Status**: Hover over the green dot to check machine status
## Step 2: Start Your Machine
### Select Machine Configuration
Choose from available configurations:
* **CPUx3**: 3 CPU cores, 24GB RAM, ready in under 30 seconds (recommended for beginners)
* **CPUx7**: 7 CPU cores, 53GB RAM, ready in over 2 minutes
* **GPU Machines**: For machine learning and complex processing
### Start Machine
1. **Click "Start Machine"**: Click the prominent white button
2. **Wait for Ready**: Machine will be ready in 15-40 seconds
3. **Monitor Status**: Hover over the green dot to check machine status
 ## Step 3: Add Content Blocks
### Using the "+" Icon
1. **Find "+" Button**: Look for the "+" icon on the left of any row
2. **Click "+"**: Click to add a new block
3. **Select Block Type**: Choose from code, markdown, alerts, or media blocks
### Using Keyboard Shortcut
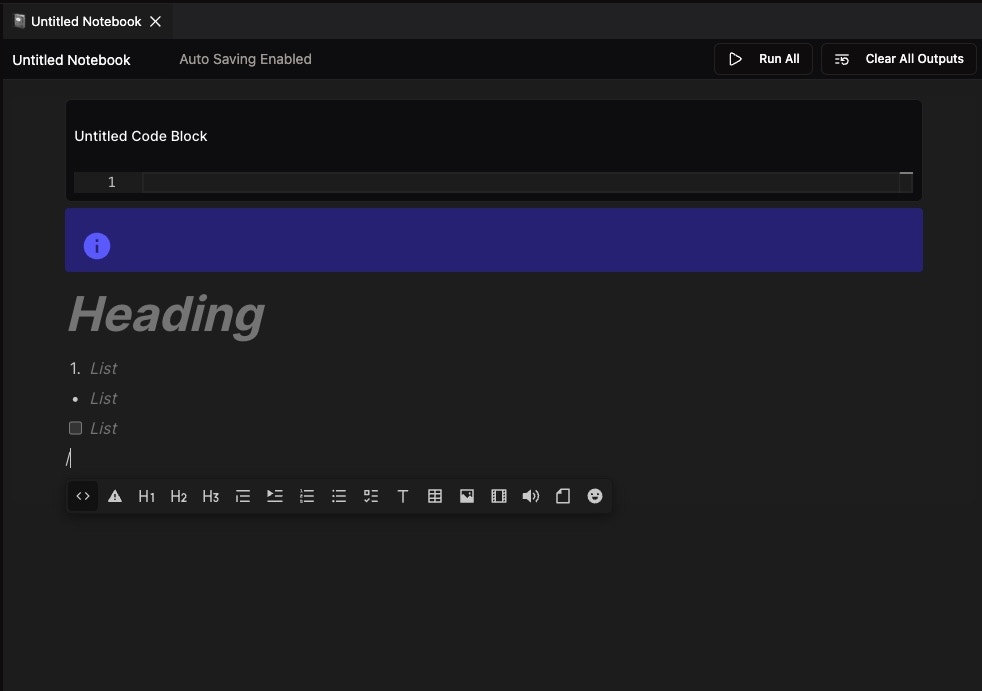
* **Press "/"**: Type "/" in any empty row to trigger block selection
* **Choose Block**: Select the desired block type from the menu
### Available Block Types
* **Code Block**: For Python code execution
* **Alert Block**: Highlight important information
* **Headings**: Create section headers
* **Media**: Insert images, videos, or file attachments
## Step 3: Add Content Blocks
### Using the "+" Icon
1. **Find "+" Button**: Look for the "+" icon on the left of any row
2. **Click "+"**: Click to add a new block
3. **Select Block Type**: Choose from code, markdown, alerts, or media blocks
### Using Keyboard Shortcut
* **Press "/"**: Type "/" in any empty row to trigger block selection
* **Choose Block**: Select the desired block type from the menu
### Available Block Types
* **Code Block**: For Python code execution
* **Alert Block**: Highlight important information
* **Headings**: Create section headers
* **Media**: Insert images, videos, or file attachments
 ## Step 4: Run Your Code
### Multiple Execution Methods
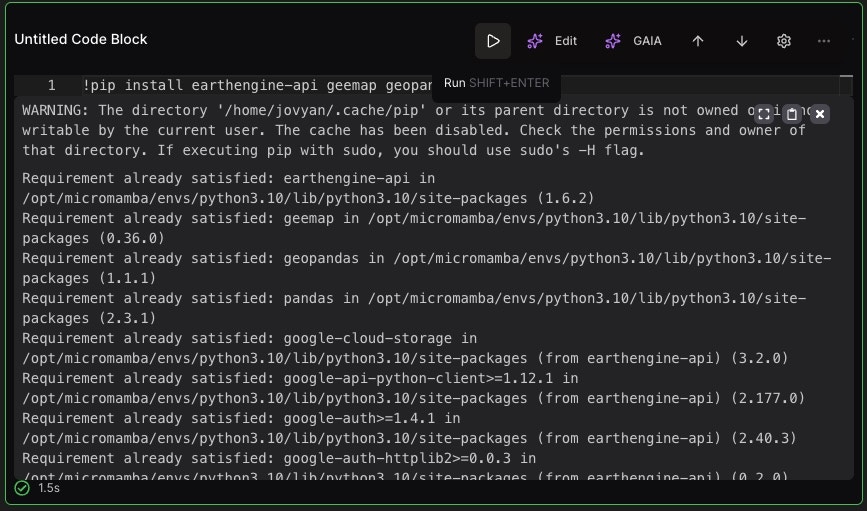
1. **Hover Menu**: Hover over code block and click the play button (▶️)
2. **Keyboard Shortcut**: Select block and press `Shift+Enter`
3. **Run All**: Use "Run All" button in top-right toolbar for sequential execution
### Streaming Execution
* **Real-time Output**: Results stream in from the kernel
* **Background Processing**: Long-running code continues even if you close the workspace
* **Return Later**: Come back hours later to see completed results
## Step 4: Run Your Code
### Multiple Execution Methods
1. **Hover Menu**: Hover over code block and click the play button (▶️)
2. **Keyboard Shortcut**: Select block and press `Shift+Enter`
3. **Run All**: Use "Run All" button in top-right toolbar for sequential execution
### Streaming Execution
* **Real-time Output**: Results stream in from the kernel
* **Background Processing**: Long-running code continues even if you close the workspace
* **Return Later**: Come back hours later to see completed results
 ## Step 5: Use Pre-installed Geospatial Libraries
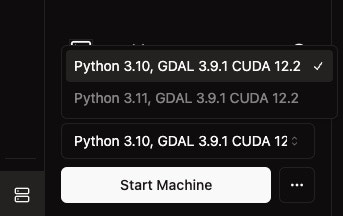
### GDAL and CUDA Ready
All VM kernels come with:
* **GDAL 3.9.1**: Geospatial Data Abstraction Library
* **CUDA 12.2**: NVIDIA CUDA for GPU acceleration
* **Python 3.10/3.11**: Multiple Python versions available
### Example Geospatial Code
```python theme={null}
# Import geospatial libraries
import rasterio
import geopandas as gpd
import numpy as np
# Load raster data
with rasterio.open('/workspace/data/satellite.tif') as src:
data = src.read()
print(f"Raster size: {src.width} x {src.height}")
# Load vector data
gdf = gpd.read_file('/workspace/data/shapefile.shp')
print(f"Number of features: {len(gdf)}")
# Perform analysis
ndvi = (data[3] - data[2]) / (data[3] + data[2])
print(f"NDVI calculated successfully")
```
## Step 5: Use Pre-installed Geospatial Libraries
### GDAL and CUDA Ready
All VM kernels come with:
* **GDAL 3.9.1**: Geospatial Data Abstraction Library
* **CUDA 12.2**: NVIDIA CUDA for GPU acceleration
* **Python 3.10/3.11**: Multiple Python versions available
### Example Geospatial Code
```python theme={null}
# Import geospatial libraries
import rasterio
import geopandas as gpd
import numpy as np
# Load raster data
with rasterio.open('/workspace/data/satellite.tif') as src:
data = src.read()
print(f"Raster size: {src.width} x {src.height}")
# Load vector data
gdf = gpd.read_file('/workspace/data/shapefile.shp')
print(f"Number of features: {len(gdf)}")
# Perform analysis
ndvi = (data[3] - data[2]) / (data[3] + data[2])
print(f"NDVI calculated successfully")
```
 ## Step 6: Use AI-Powered Features
### Quick AI Edit
* **Press `Cmd/Ctrl + K`**: Get AI suggestions for code improvements
* **Green Suggestions**: AI suggestions appear in green text
* **Preview Execution**: Test suggested changes before accepting
* **Accept/Reject**: Choose which suggestions to keep
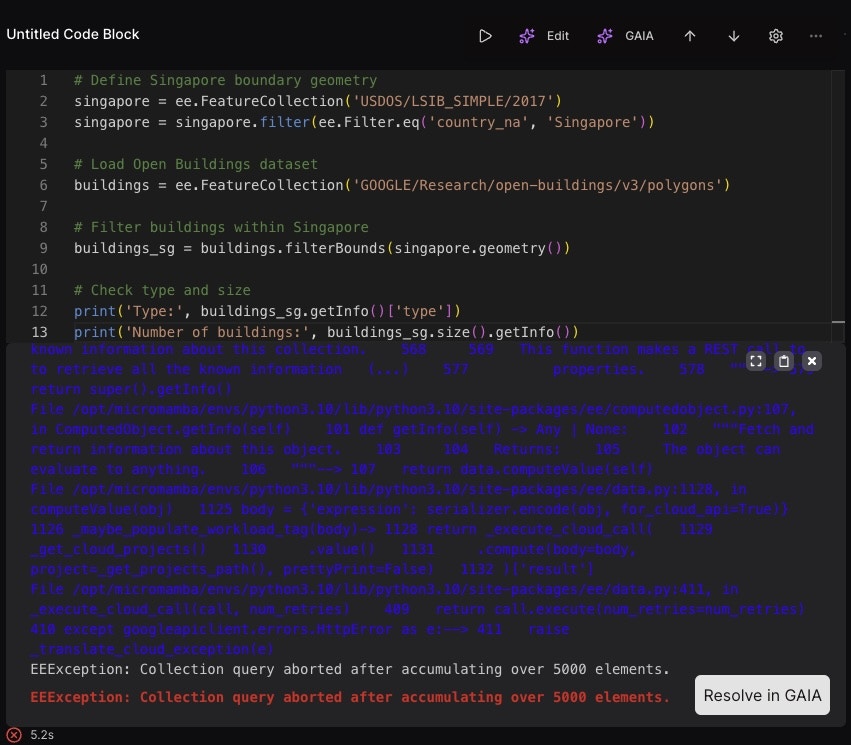
### Error Resolution with GAIA
* **"Resolve in GAIA" Button**: Click when you encounter errors
* **AI Analysis**: GAIA analyzes your entire notebook context
* **Chat Interface**: Ask questions and get AI assistance
* **Direct Modifications**: AI can modify your notebook directly
## Step 6: Use AI-Powered Features
### Quick AI Edit
* **Press `Cmd/Ctrl + K`**: Get AI suggestions for code improvements
* **Green Suggestions**: AI suggestions appear in green text
* **Preview Execution**: Test suggested changes before accepting
* **Accept/Reject**: Choose which suggestions to keep
### Error Resolution with GAIA
* **"Resolve in GAIA" Button**: Click when you encounter errors
* **AI Analysis**: GAIA analyzes your entire notebook context
* **Chat Interface**: Ask questions and get AI assistance
* **Direct Modifications**: AI can modify your notebook directly
 ## Step 7: Publish Your Analysis
### Prepare for Publishing
1. **Finalize Your Analysis**: Ensure all code blocks are executed
2. **Add Documentation**: Include markdown blocks explaining your work
3. **Test Functionality**: Verify all interactive features work
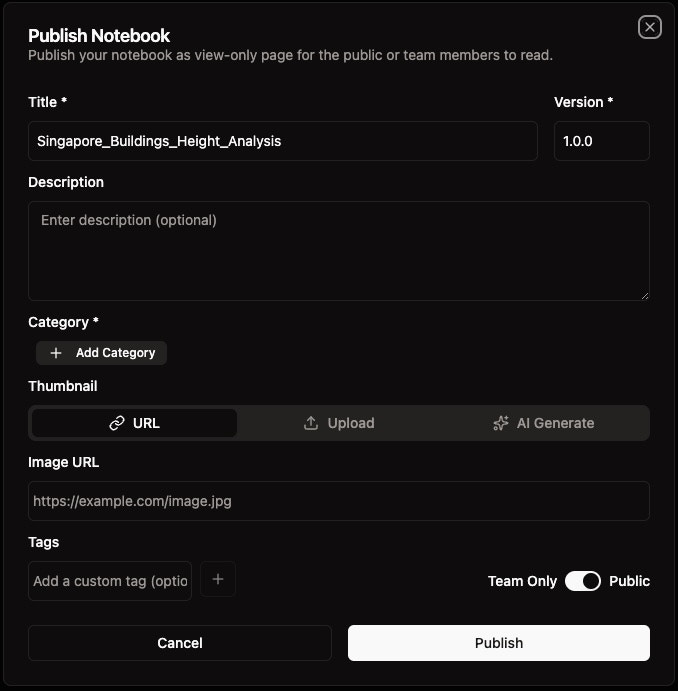
### Publish Your Notebook
1. **Right-click Notebook**: Right-click on your notebook in the list
2. **Select "Publish"**: Choose the publish option from the context menu
3. **Fill Required Fields**: Enter title\*, version\*, and category\*
4. **Generate Thumbnail**: Use AI generation if you don't have a thumbnail
5. **Set Visibility**: Choose Team Only or Public access
6. **Click Publish**: Finalize your publication
### View Published Notebook
* **Click Arrow Icon**: Click the arrow icon in the publish dialog
* **New Tab Opens**: Your published notebook opens in a new tab
* **Static View**: Notebook is view-only for others
* **Public Hub**: If public, appears in the NikaHub
## Step 7: Publish Your Analysis
### Prepare for Publishing
1. **Finalize Your Analysis**: Ensure all code blocks are executed
2. **Add Documentation**: Include markdown blocks explaining your work
3. **Test Functionality**: Verify all interactive features work
### Publish Your Notebook
1. **Right-click Notebook**: Right-click on your notebook in the list
2. **Select "Publish"**: Choose the publish option from the context menu
3. **Fill Required Fields**: Enter title\*, version\*, and category\*
4. **Generate Thumbnail**: Use AI generation if you don't have a thumbnail
5. **Set Visibility**: Choose Team Only or Public access
6. **Click Publish**: Finalize your publication
### View Published Notebook
* **Click Arrow Icon**: Click the arrow icon in the publish dialog
* **New Tab Opens**: Your published notebook opens in a new tab
* **Static View**: Notebook is view-only for others
* **Public Hub**: If public, appears in the NikaHub
 ## Key Features Summary
### Easy to Use
* **Auto-save**: Everything is automatically saved
* **Streaming Execution**: Long-running tasks continue in background
* **Multiple Execution Methods**: Hover, keyboard shortcuts, or run all
* **Block Reordering**: Easy reordering with arrow buttons
### Powerful Analysis
* **Pre-installed Libraries**: GDAL, CUDA, and Python ready to use
* **Large Dataset Support**: Work with TB-PB sized geospatial data
* **GPU Acceleration**: Use CUDA for faster processing
* **Real-time Linting**: Code quality feedback as you type
### AI-Powered
* **Quick AI Edit**: Get code suggestions with `Cmd/Ctrl + K`
* **Error Resolution**: Use GAIA for intelligent error fixing
* **Context-Aware**: AI understands your entire notebook
* **Chat Interface**: Natural language interaction with AI
### Collaboration Ready
* **Team Publishing**: Share with team members
* **Public Hub**: Share with the broader community
* **Version Control**: Maintain different versions of your work
* **Easy Updates**: Modify and republish as needed
## Next Steps
Now that you've completed the tutorial:
1. **Explore Libraries**: Check [Supported Python Libraries](/guides/data-analysis/supported-python-libraries)
2. **Advanced Features**: Learn about [AI Coding in Notebook](/guides/data-analysis/ai-coding-in-notebook)
3. **Machine Management**: Understand [Starting Your Machine](/guides/data-analysis/start-machine)
4. **Publishing**: Master [Publishing Your Notebook](/guides/data-analysis/publish-notebook)
Happy geospatial analyzing!
## Key Features Summary
### Easy to Use
* **Auto-save**: Everything is automatically saved
* **Streaming Execution**: Long-running tasks continue in background
* **Multiple Execution Methods**: Hover, keyboard shortcuts, or run all
* **Block Reordering**: Easy reordering with arrow buttons
### Powerful Analysis
* **Pre-installed Libraries**: GDAL, CUDA, and Python ready to use
* **Large Dataset Support**: Work with TB-PB sized geospatial data
* **GPU Acceleration**: Use CUDA for faster processing
* **Real-time Linting**: Code quality feedback as you type
### AI-Powered
* **Quick AI Edit**: Get code suggestions with `Cmd/Ctrl + K`
* **Error Resolution**: Use GAIA for intelligent error fixing
* **Context-Aware**: AI understands your entire notebook
* **Chat Interface**: Natural language interaction with AI
### Collaboration Ready
* **Team Publishing**: Share with team members
* **Public Hub**: Share with the broader community
* **Version Control**: Maintain different versions of your work
* **Easy Updates**: Modify and republish as needed
## Next Steps
Now that you've completed the tutorial:
1. **Explore Libraries**: Check [Supported Python Libraries](/guides/data-analysis/supported-python-libraries)
2. **Advanced Features**: Learn about [AI Coding in Notebook](/guides/data-analysis/ai-coding-in-notebook)
3. **Machine Management**: Understand [Starting Your Machine](/guides/data-analysis/start-machine)
4. **Publishing**: Master [Publishing Your Notebook](/guides/data-analysis/publish-notebook)
Happy geospatial analyzing!