> ## Documentation Index
> Fetch the complete documentation index at: https://docs.nikaplanet.com/llms.txt
> Use this file to discover all available pages before exploring further.
# Getting Started With NikaWorkspace
> Learn the basics of Nika platform and get familiar with the interface
## Getting Started with NikaWorkspace
Welcome to Nika! This guide will help you get familiar with the platform and start your first project.
## Prerequisites
Before you begin, make sure you have:
* **Nika Account**: Sign up at [https://planet.nika.eco](https://planet.nika.eco)
* **Onboarding**: Book and complete your [onboarding call](https://cal.com/dianaong/30-minute-consultation) to get trial access
## Step 1: Manage Data Workspaces
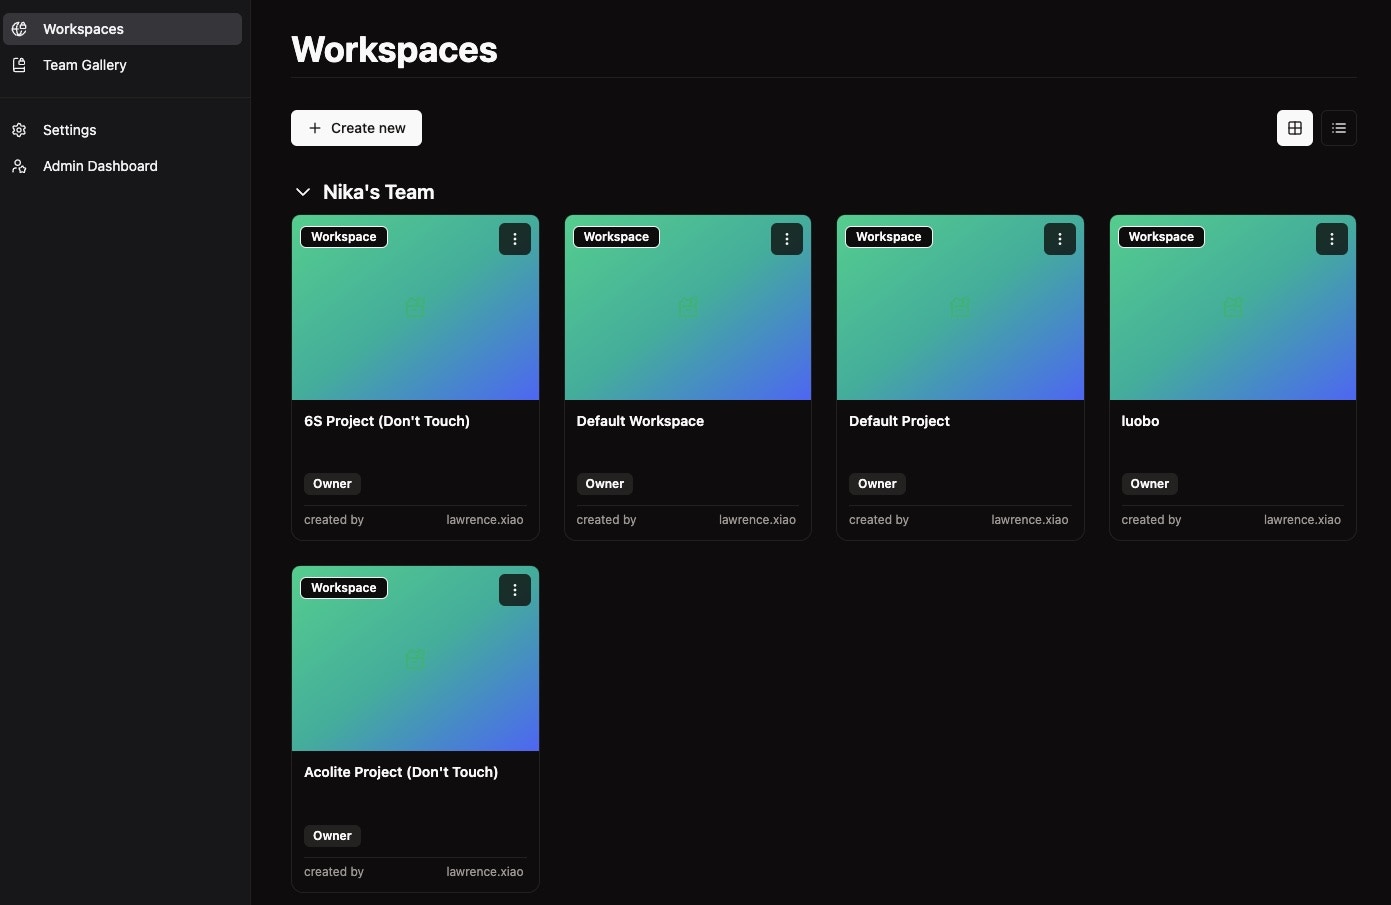
1. **Project**: Each of your workspaces is a logical separation for project management, to keep your resources such as file storage, notebooks, maps and databases separate.
2. **Login**: Visit [https://planet.nika.eco](https://planet.nika.eco) and sign in
3. **Dashboard**: You'll see your main dashboard with access to a default workspace if you log in for the first time
4. **Navigation**: Click on the default workspace to open, use the left sidebar to navigate between different tools
 ## Step 2: Explore the Interface
### Main Components
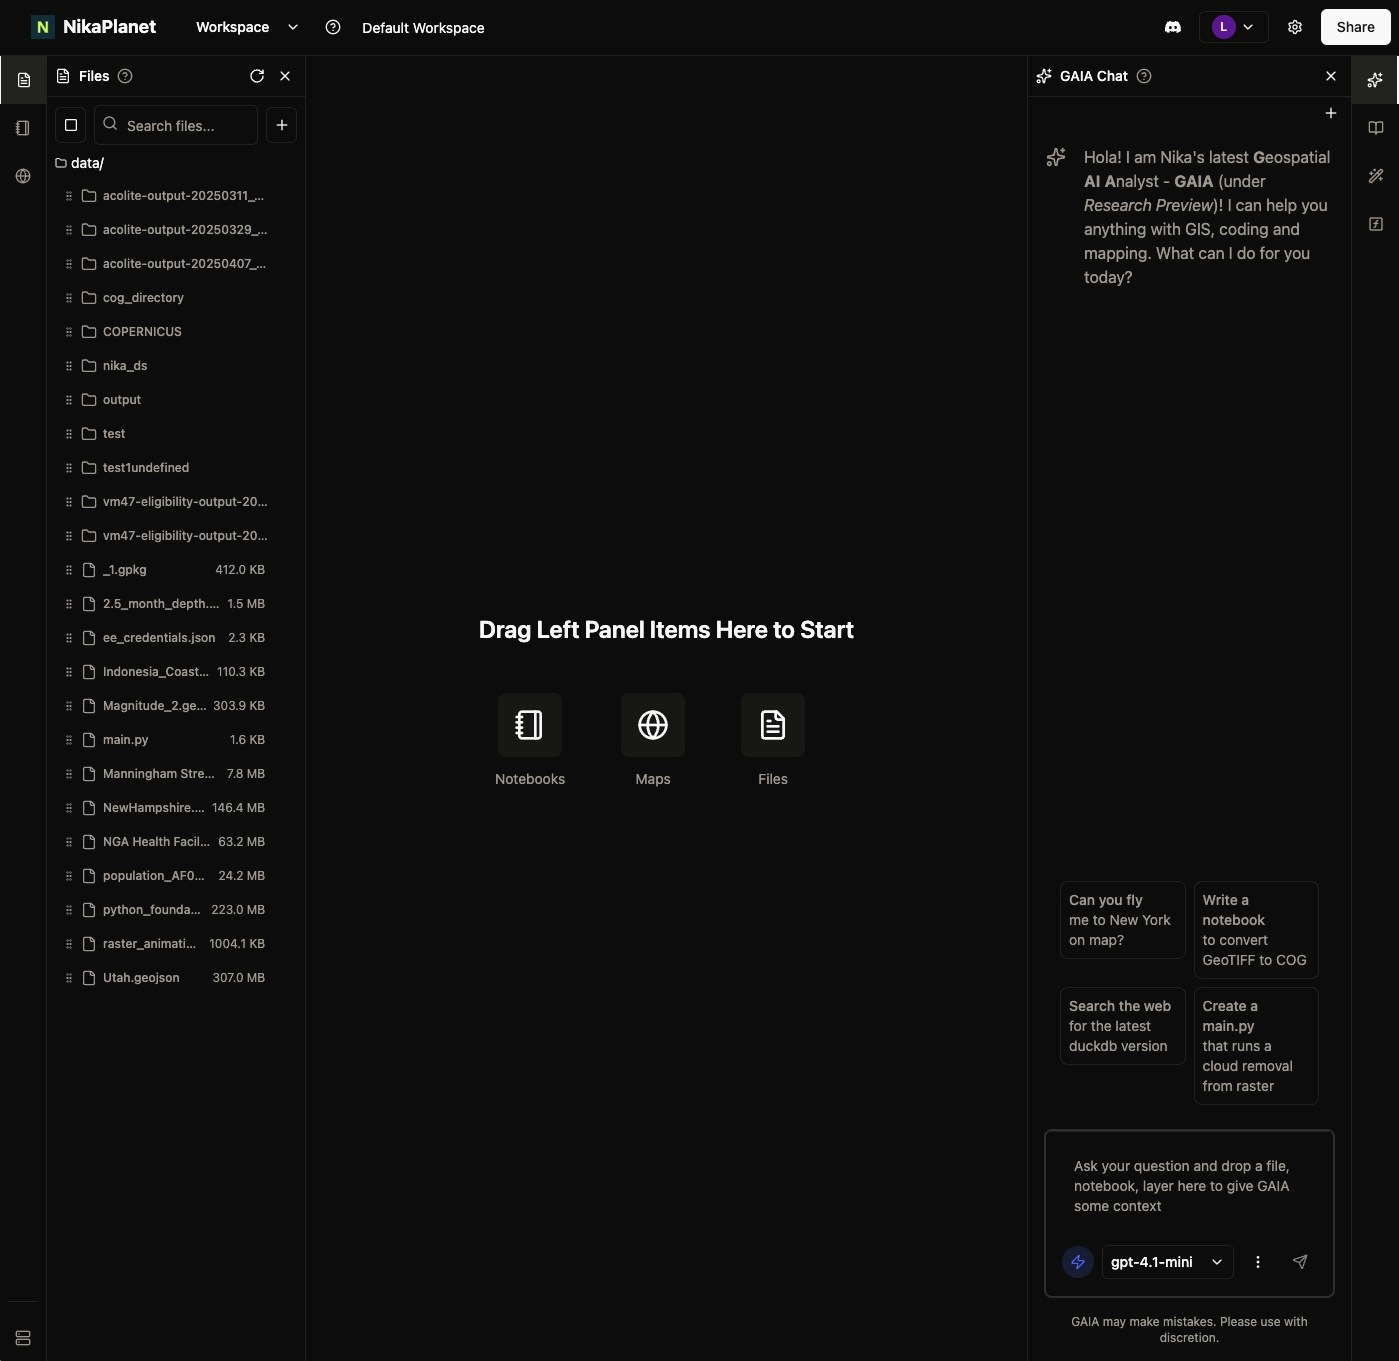
* **Left Sidebar**: Navigation between Nika products
* **Top Bar**: User settings, notifications, and help
* **Main Area**: Content area that changes based on selected tool
* **Right Panel**: Context-sensitive tools and options
## Step 2: Explore the Interface
### Main Components
* **Left Sidebar**: Navigation between Nika products
* **Top Bar**: User settings, notifications, and help
* **Main Area**: Content area that changes based on selected tool
* **Right Panel**: Context-sensitive tools and options
 ### Available Tools in Nika
* **Nika Notebooks**: Data analysis, notebooks and VM
* **Nika Map**: Interactive map visualization
* **Nika Studio**: Application development
* **Publish to Nika Hub**: Community and team internal sharing
* **Nika Labeler**: Image annotation
* **Nika ETL**: Data processing pipelines
* **Nika Database Engine**: Intergration with your existing databases or one click creation of Nika managed DuckDB instance
* **Nika GAIA**: Nika's AI Agent for coding and mapping
### Create a New Map
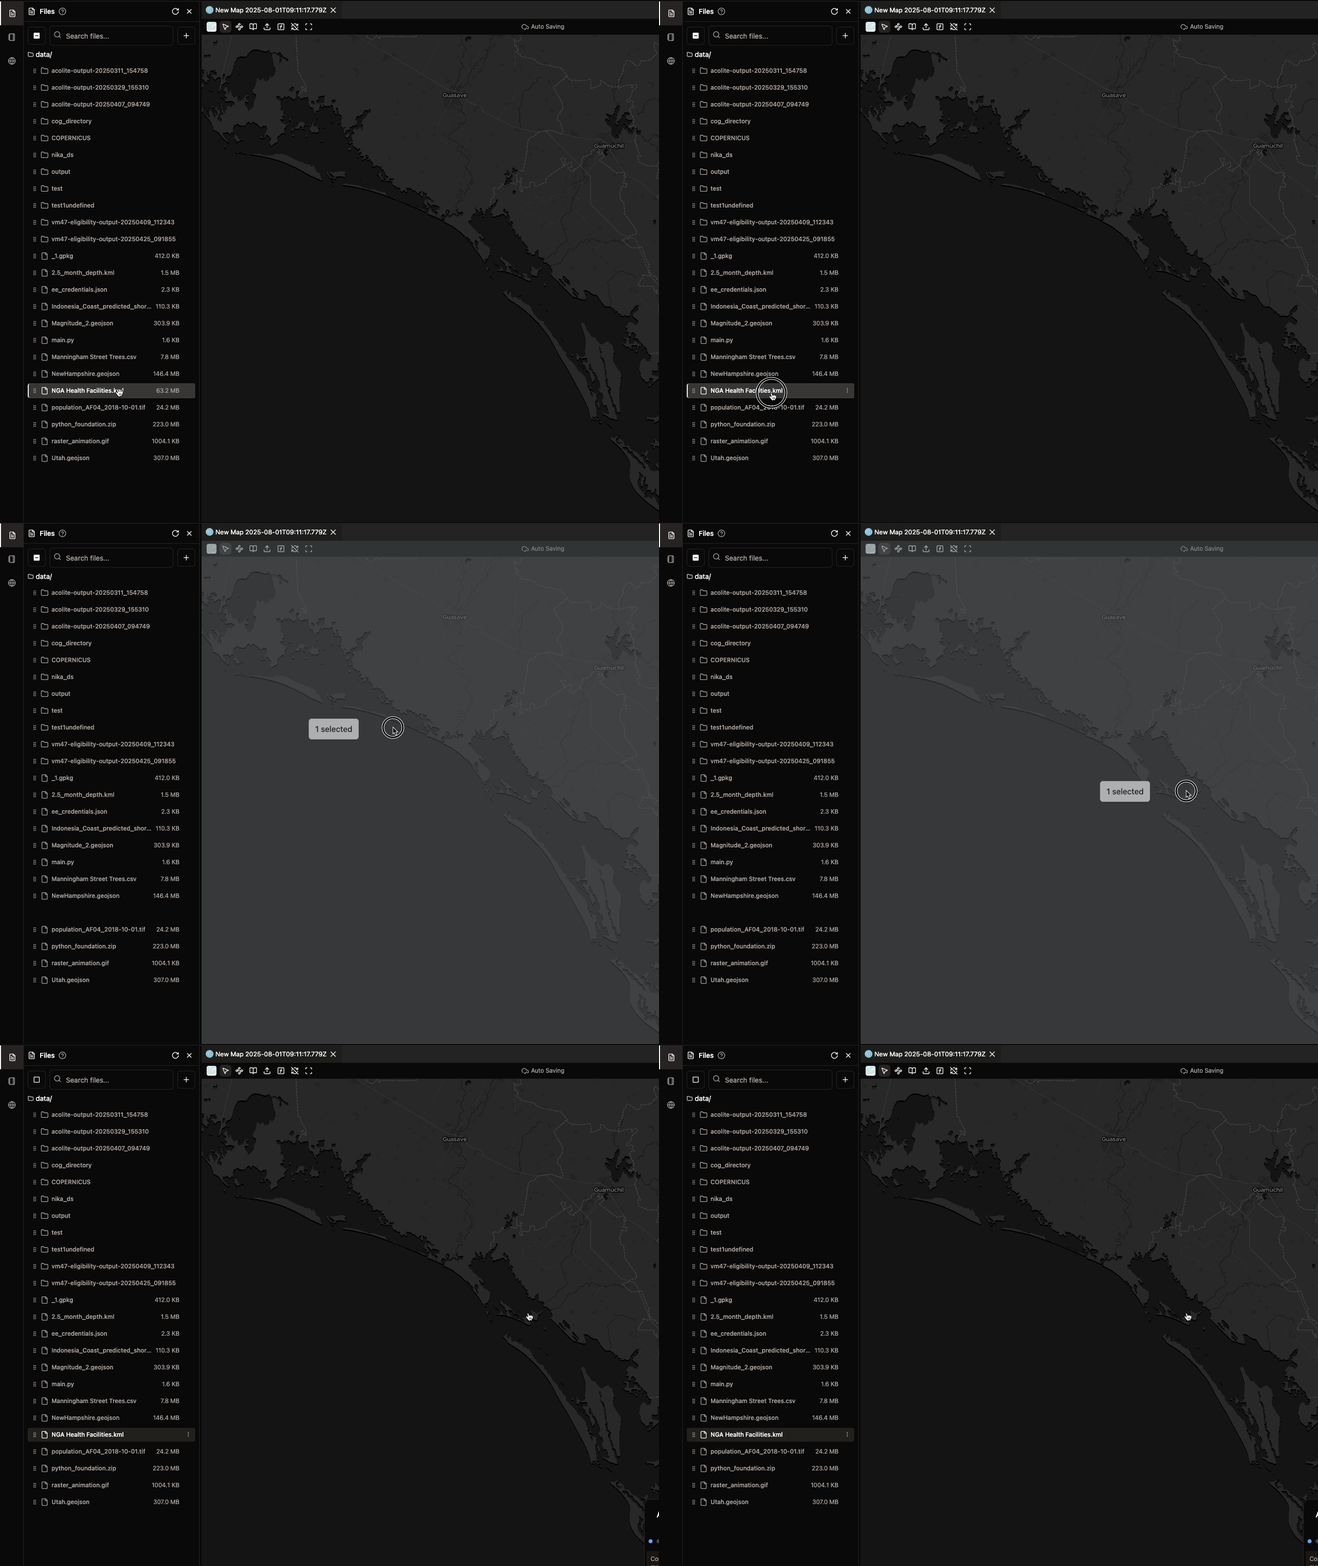
1. **Click Map** icon in the left sidebar
2. **Click "+"** button to create new map
3. **Drag files** from the files list in left sidebar to add as layer to the open map. Note: drop to the center of the map to trigger `Add to Map` instead of opening file
### Available Tools in Nika
* **Nika Notebooks**: Data analysis, notebooks and VM
* **Nika Map**: Interactive map visualization
* **Nika Studio**: Application development
* **Publish to Nika Hub**: Community and team internal sharing
* **Nika Labeler**: Image annotation
* **Nika ETL**: Data processing pipelines
* **Nika Database Engine**: Intergration with your existing databases or one click creation of Nika managed DuckDB instance
* **Nika GAIA**: Nika's AI Agent for coding and mapping
### Create a New Map
1. **Click Map** icon in the left sidebar
2. **Click "+"** button to create new map
3. **Drag files** from the files list in left sidebar to add as layer to the open map. Note: drop to the center of the map to trigger `Add to Map` instead of opening file
 ### Create a New Notebook
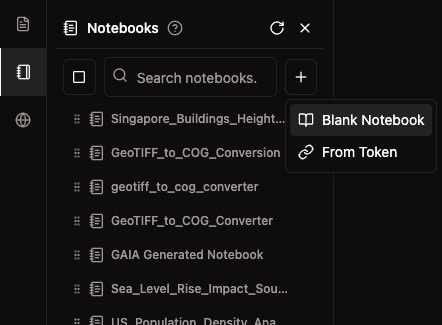
1. **Click Notebook** icon in the left sidebar
2. **Click "+"** button to create new notebook
3. **Click Machine** icon at bottom left to then start the machine
4. **Run code in your notebook** by following this [guide](/guides/data-analysis/run-code-in-notebook)
### Create a New Notebook
1. **Click Notebook** icon in the left sidebar
2. **Click "+"** button to create new notebook
3. **Click Machine** icon at bottom left to then start the machine
4. **Run code in your notebook** by following this [guide](/guides/data-analysis/run-code-in-notebook)
 ## Step 3: Upload Your First Data
### Upload Files
1. **Click "Files"** in the left sidebar
2. **Click "Upload"** button and select your files from desktop
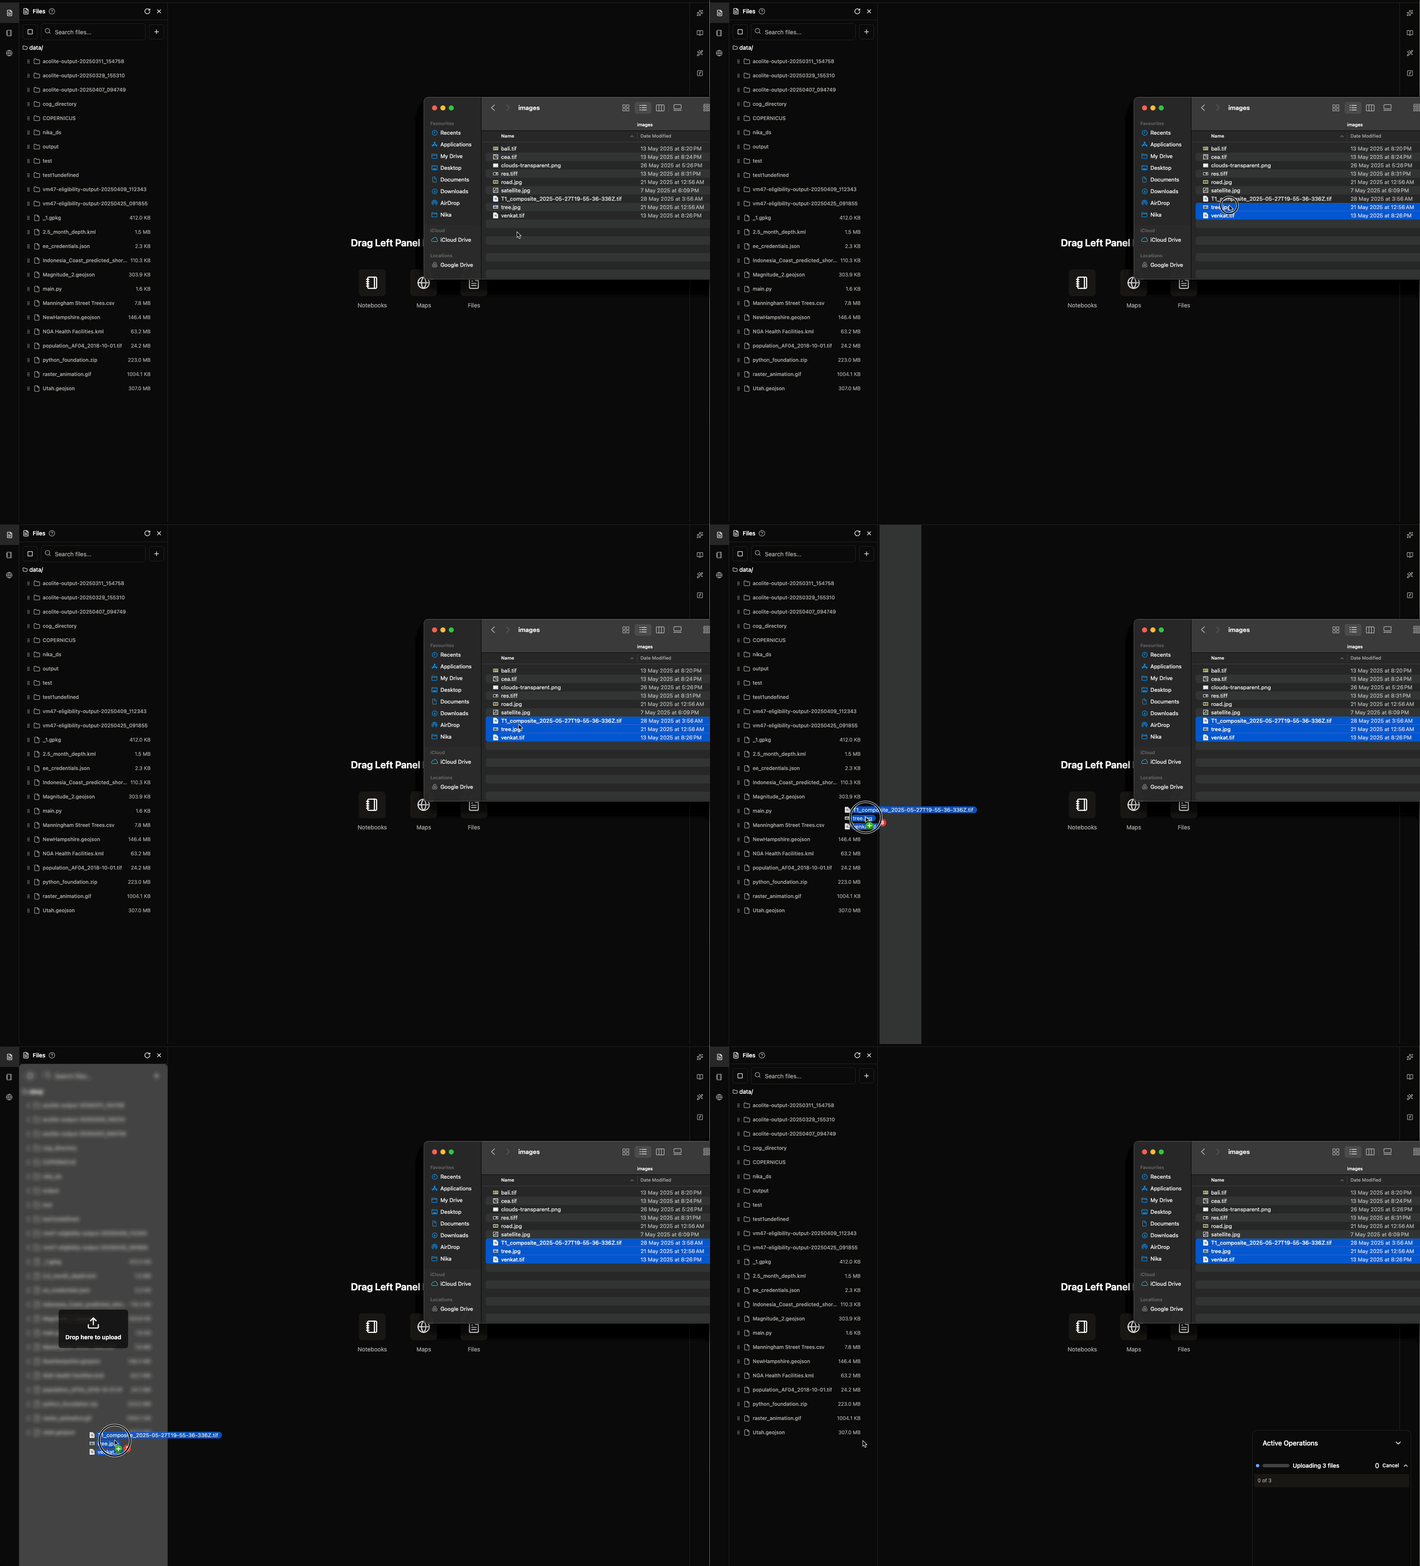
3. **Drag and Drop** alternaitvely, drag multiple files and drop them on the file list when left sidebar is open
4. **Wait for processing** to complete
## Step 3: Upload Your First Data
### Upload Files
1. **Click "Files"** in the left sidebar
2. **Click "Upload"** button and select your files from desktop
3. **Drag and Drop** alternaitvely, drag multiple files and drop them on the file list when left sidebar is open
4. **Wait for processing** to complete
 ### Design of Nika File Storage
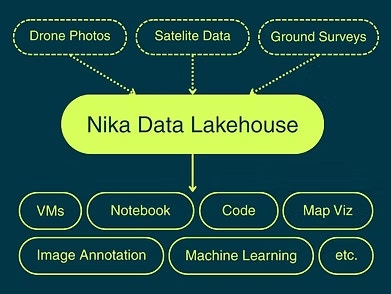
* **Size Limit**: Theoretically Nika Cloud FS can host up to 100s of TB size per workspace
* **Integration**: These files are natively accessible in your notebook code through secure connection, and adding them as layer to map is as easy as drag and drop on map
* **Editor**: For certain formats like .py, .json, .js, you can double click to open the file in Nika web UI and edit them directly
* **Machine Learning**: If you are try to train machine learning models over a large groups of test/train/eval split datasets, Nika FS is the best option as your machine learning code in notebook work immediately on files
### Design of Nika File Storage
* **Size Limit**: Theoretically Nika Cloud FS can host up to 100s of TB size per workspace
* **Integration**: These files are natively accessible in your notebook code through secure connection, and adding them as layer to map is as easy as drag and drop on map
* **Editor**: For certain formats like .py, .json, .js, you can double click to open the file in Nika web UI and edit them directly
* **Machine Learning**: If you are try to train machine learning models over a large groups of test/train/eval split datasets, Nika FS is the best option as your machine learning code in notebook work immediately on files
 ## Next Steps
Now that you're familiar with the basics:
1. **Try Making a Map**: Follow the [Create NikaMap Tutorial](/guides/tutorials/map-visualization) guide
2. **Start Data Analysis**: Follow the [Create Notebook Tutorial](/guides/tutorials/geospatial-analysis) guide
3. **Explore Features**: Check out the other guides in this section
4. **Join Community**: Visit [NikaHub](https://planet.nika.eco/en/hub) to see examples
Happy mapping and analyzing!
## Next Steps
Now that you're familiar with the basics:
1. **Try Making a Map**: Follow the [Create NikaMap Tutorial](/guides/tutorials/map-visualization) guide
2. **Start Data Analysis**: Follow the [Create Notebook Tutorial](/guides/tutorials/geospatial-analysis) guide
3. **Explore Features**: Check out the other guides in this section
4. **Join Community**: Visit [NikaHub](https://planet.nika.eco/en/hub) to see examples
Happy mapping and analyzing!